Monday 20 January 2014

Old Fashioned Lemon Cordial

Lemon Cordial

If you are looking for something to quench your thirst over summer, then look no further than this delicious, mouth-watering lemon cordial. A little goes a long way, and this makes about three litres of cordial just like Grandma used to make.

2kg sugar
Grated rind and juice of six lemons
1 Tablespoon Tartaric Acid
1 Tablespoon Epsom Salts
2 Tablespoons Citric Acid
6 cups boiling water.

Place all the dry ingredients into a large bowl, saucepan or basin.

Add the lemon juice and rind. Don't worry too much about pips and pulp, these will all be strained out later.

Pour over boiling water and stir until dissolved.

Strain the cordial and place into clean, sterilised bottles. I use a big soup ladle to scoop the hot syrup (through a sieve) into a jug, to reduce the risk of a hot, sticky mess. The liquid is then easily poured into bottles via a funnel.

The cordial needs to be stored in the refrigerator. Dilute it to taste, with water or soda water to serve. Remember, a little goes a really long way, this is quite a strong cordial so you don't need very much.

For a change, try it with oranges instead of lemons, or combine different citrus fruits for your own yummy cordial flavours.

Thursday 16 January 2014

Woodland Sailor Shorts

Woodland Sailor Shorts and t-shirt

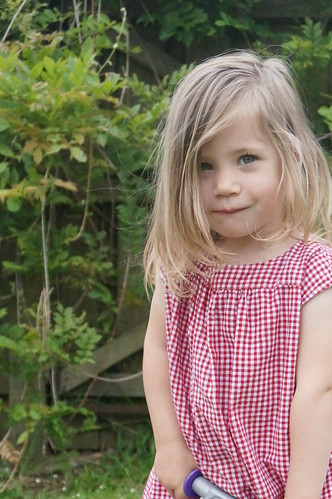
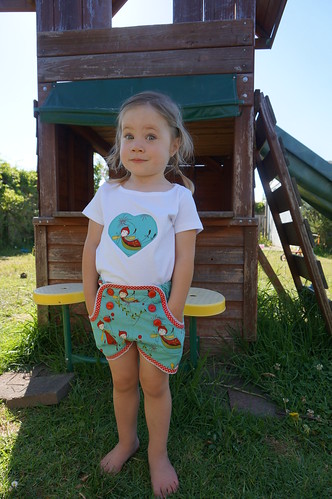
I made these CUTE shorts for Amélie, back at the end of November. The fabric is Woodland Fairies by Natalie Lymer of Cinderberry Stitches for Lecien. I have had this in my stash for a little while, waiting for the right project to come along and here it is. The pattern I used is the Sailor Shorts pattern from the Peek-a-boo Pattern Shop on Etsy. If you've never shopped on Etsy before, you can use this link to get $5 off your first purchase. In the interests of full disclosure, if two people use this link, I also get $10 off my next Etsy purchase. You must be new to Etsy for the link to work.

If you are making these shorts, I would recommend going up a size to usual, especially if your child is still in nappies. Amélie is not wearing a nappy in these pictures, but when she was wearing one, it poked out the top at the back. I am not sure if the "T" in the sizes actually means they are sized for a nappy or not, but Amélie still wears mostly size two pants, and these were very snug with the nappy on.

Woodland Sailor Shorts

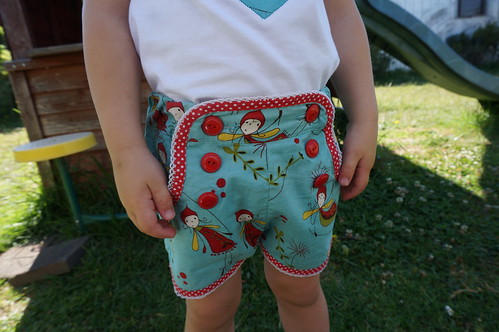
I feel that the construction of the band across the front (the short waistband) was more complicated than necessary. The seam allowances are all encased, which means there is more bulk than necessary in those edges that are just going to be covered with bias binding anyway. A pattern piece with the curved edges and button holes marked would be preferable to instructions where you cut a rectangle and add the curves yourself. If the top edge was open, rather than folded, there would be no messing about with trying to catch an edge in your topstitching. Much quicker, less bulk and no curve clipping (not that there is any mention of curve-clipping!). I would also suggest some interfacing be applied to this waistband, especially since there are button-holes. In addition to this, some dots to indicate the position of buttons on the front would be nice as would notches in some of the seams.

Woodland Sailor Shorts and t-shirt 2

Having said all of that, these really are a cute little pair of shorts and it was still a pretty good pattern with great instructions and clear photos at each step. I would still recommend this pattern and I am sure to buy more from this designer. I did an extra little alteration myself, by adding adjustable buttonhole elastic to the waistband. Instead of stopping at the side seams (the elastic in the pattern only goes across the back), I put some buttonholes in the ends of the long waistband (hidden behind the front, short waistband) and threaded the elastic right the way around, making the shorts adjustable. I did this mainly because I was making size three and thought they might need to be adjusted tighter for Amélie.

If you want to make these shorts, and you haven't used bias binding before, the picot edged bias is really easy to use. The picot edge keeps that fold in the middle, so catching the edge of the bias on the back when you topstitch on the front is far easier than with regular bias, particularly around the curves.

Oh, I nearly forgot to mention the t-shirt she is wearing! It was a $2 plain t-shirt from K-Mart that I appliquéd with a heart shape from my scraps using a little Steam a Seam, some cut away on the back and a machine blanket stitch. It only took me a few minutes and now she has a cute t-shirt to match her shorts.


I used about half a metre of fabric to make these shorts, so two fat quarters of fabric, SYST13 Running totals: in = 140, out = 270, total = -130

Have you ever purchased a pattern from Etsy? Any you recommend?


Tuesday 14 January 2014

Hollywood Cherise

Hollywood Cherise - Amélie

The Hollywood Cherise features in the Summer 3/2012 issue of Ottobre. The main part of the dress is gathered onto a yoke and as the little cap sleeves are part of the rest of the dress, there are no sleeves to sew, making this a quick dress to put together. I made this gingham version for Amélie around the end of November or start of December.

Hollywood Cherise - front

I omitted the pockets from the pattern.The instructions suggest cutting them on the bias, but I had trouble maintaining the nice square shape when I did that, so ditched them altogether. Most likely they would only end up full of sand at this time of year, anyway.

Hollywood Cherise - bike

As you can see from the photos, it is a comfortable dress to wear. Amélie has no trouble playing in it, and it is perfectly breezy for a hot, summer day. It can also be made shorter, if you like, so it can be worn with pants or shorts as a tunic, rather than the full-length dress.

Hollywood Cherise - back

The final detail was the pearl snaps I added to the back of the dress. Easy to do up and undo, and a perfect compliment to the classic red gingham fabric I used. I love this pattern, and Amélie seems to love wearing it, so I might revisit it some time with some different fabrics.


The Hollywood Cerise used about three fat quarters of fabric from my stash. The Christmas Tree Skirt in the previous blog post used approximately 10 FQs of fabric, but I bought six FQs of fabric and used the rest from my stash. I also purchased 15 FQs of fabric to make myself a top and a further 12 FQs to make Maxx a shirt. Why, oh why does this feel like a major confession?! SYST13 Running totals: in = 140, out = 268, total = -128

Sunday 12 January 2014

A Christmas Tree Skirt

Tree skirt top

Each year I try to add something hand-made to our Christmas decorations. This year it was the tree skirt. I followed the directions for A Simple Old-Fashioned Christmas Tree Skirt which I found on the Moda Bake Shop website. The pattern really is very simple and is just a top with binding around the edge. I decided to back mine and quilt it before binding.

Tree Skirt back

The instructions fail to mention any indication of seam allowance. I assumed there was a 1/4 inch (6mm) seam allowance included. The pattern pieces are not accurate anyway, as there are pieces you have to chop off after each seam. I did something a bit different to the instructions, which was to use all one colour for one star piece and another colour for the other star piece. The original pattern used the same colour for both pieces on each block (does that make sense?)This meant the two greens alternated all around the skirt. If you decide to do the same, you need to realise that you can't just fold and cut, all pieces must be stacked with right sides all facing the same way and cut.

I prefer the way the original skirt was pieced, as it gives the star a three dimensional look, which I thought mine would get too, but instead mine has a bit of a pin-wheel-spinny look if you get what I mean. I think a chunkier star would have shown off the green fabrics a bit better too.

Tree Skirt - free motion detail

I quilted around each star point, just next to the ditch with some green Aurifil, using my walking foot and then switched over to my free-motion foot and used some red Gütermann sew-all, as that is what I had at the time. I chose to do a kind of feathery-paisley quilt pattern, which wasn't really a pattern, but sort of made-up as I went thing kind of (very loosely) inspired by the Craftsy Quilt Class I've been watching. I see that Angela Walters has a feathers class too, I might have to take a look at it.

I finished my Tree Skirt up with some picot-edge bias that I purchased from the Haby Goddess. I didn't quite have enough, so I finished up the straight edges with some left-over strips from the Walk in the Woods Jelly Roll from Amélie's quilt.

This wasn't the only Christmas item I made this year. I also made some Chubby birds and Gingerbread men decorations for teacher presents, but I was so busy that week that I never stopped to take photos before gifting them. You can see other gingerbread man decorations that I have made in Christmases past, but I haven't made any birdies and taken photos of them to show you.

Chubby Birds

Would you like to be able to make a Chubby Bird of your own? You can buy the pattern on Craftsy, here, (for really cheap) and get it instantly, but if you like, I have a spare copy of this pattern. Not a digital one, but an original greeting card sized pattern. I bought one, and I also have one that was given to me and I would like to give it to one of my readers. If you would like to be the lucky recipient of this Creative Card, tell me where you are from, how you found my blog and why I should give it to you. I will choose the best answer in a couple of weeks. I am happy to post it to anywhere in the world.

Sunday 5 January 2014

Roxy Long Socks

Roxy Long Socks

It is so hard to get back into blogging when you have been away for so long. Life got a bit busy in that last school/kinder term and I lost my blogging mojo... I am just going to just jump back in and tell you about some of the things I made in the last couple of months (one at a time), and then we will just carry on as if I was here all along, okay? Let's start with Roxy Long Socks.

Roxy Long Socks is a pattern by Lisa Tilse of The Red Thread. Lisa gave me this pattern after I did some pattern testing for her. I've always admired Roxy, and I just knew she would be loads of fun to make. The pattern comes with a printed face panel, and you can buy additional face panels if you want to make more, or there are even instructions to make your own face if you wish. The pattern includes both a spring and winter version of Roxy. I chose to go with the Winter version as I liked the pointy hood.

DSC00918

I made Roxy for Amélie for Christmas. Apart from the face panel that came with the pattern, she was made entirely from scraps from my stash. I put her together over two nights, so a reasonably quick project. I must admit, that first night I was up until 3am.... Of course, Amélie was quite happy to add Roxy to her ever-growing collection of hand-made dolls. She is quite a tall doll, at around 65cms. Here is a picture of Roxy with some of Amélie's other dolls to give an idea of scale.
The whole gang
If you are not familiar with the other dolls, let me introduce them. On the left, we have Miranda. Miranda is made using the Kinder Doll pattern by Jodie of Ric-Rac. She does have a nice dress, but prefers to get around in her underpants most of the time. Next to Miranda, is Elsie Cabbage, also a Ric-Rac doll, and on the other side of Roxy Long Socks is Little Red, again, a Ric-Rac pattern. Miranda has a couple of brothers and some cousins too.


I am a bit behind in blogging stuff from the SYST13 challenge, I should be caught up by the end of January. For this project, I used maybe two fat quarters in total. SYST13 Running totals: in = 107, out = 255, total = -148
Blogging tips