Saturday 31 December 2011

Amélie's Kinder Doll

DSCF1586

On Christmas Eve, whilst Santa was out putting together the big Christmas present, I was busy inside finishing off this dolly for Amélie.

DSCF1588

The pattern is from Ric-Rac, and includes the pattern for the cardigan and the beautiful dress, which is also reversible. I used some of my favourite scraps to make the dress, and trimmed it with some ric-rac from my stash.

DSCF1589

*update: the Kinder Doll pattern, as well as other fabulous Ric-Rac patterns, is now available as a down-loadable pdf: get it here!

Wednesday 28 December 2011

Christmas 2011

DSCF1548

Christmas Eve and the night before that were quite busy. I managed to whip up another Apple shirt for Liam, make another sunglasses case, and put together a dolly for Amélie. You can see the shirt in the pictures in this post, the dolly I will come back to in a later blog post.

DSCF1547

Mean-while, Santa was very busy putting together this awesome present. Santa and his helper were very busy Christmas Eve putting the final bits together and managed to beat the storm (although there was a lot of lightning - perhaps a little risky?). There were a few trimmy bits and a chalk-board that he left for us to add, Santa is very busy, you know.

DSCF1554

There was a little more to do before going to bed, the dolly still needed her dress finished, and there were snaps to apply to the shirt. So it was a bit of a late night for me, but it was worth all the effort. The kids are out on there at every opportunity and I think most of the outdoor toys (not the bikes, thank goodness) have been down the slide by now.

DSCF1526

Santa even made sure Amélie was accounted for. She loves the swing, she doesn't like getting off it much, though.

DSCF1551

Friday 23 December 2011

Is it too much?

DSCF1507

I decided in addition to the shirred dress and the frilly bloomers, my smallest gift recipient needs a hat as well. In the same fabric. I hope it's not overkill. The pattern I used was from Nicole Mallalieu's book, You Sew, Girl!. It is very similar to the kids hat pattern, but covers the smaller head of a baby under 12 months.

Thursday 22 December 2011

To Be Shirr, To Be Shirr

DSCF1505

I had never had a go at shirring, and I purchased some shirring elastic some time ago with the full intention to have a go one day. Yesterday I decided to do so. I was quite surprised with how easily it worked. It was a case of hand-winding the bobbin and dropping it in. No tension adjustments or anything! The result is not bad considering it was made with no pattern.

DSCF1504

Of course, a cute little dress requires matching bloomers, so I made a pair of these as well. I hope the recipient (and her mother) likes her gift!

Wednesday 21 December 2011

A gift for a little baker

DSCF1501

It's actually full-sized, but still good for a little baker. My brother's girlfriend has a daughter who likes to cook. I've put insul-brite the entire length of this oven mitt so that she is well protected from hot objects. I had a little stash of spatulas and I'm thinking of adding a wooden spoon or two before I wrap. Mum has made her a matching apron and a chef's hat. I hope she likes it!

Tuesday 20 December 2011

Super Hero Capes

DSCF1500

I made these superhero capes for some of my nephews. I've made some for my boys before and they are very popular and get lots of use, so hopefully their cousins will like them too. I'm a bit unsure what to make for their older cousins, but they won't be down until after Christmas so I have a bit of time up my sleeve. The pencil rolls last year seemed to go down well, and I know they are all still using their car-bags.

DSCF1499

The super hero emblems this time, were a collaboration between myself and Maxx. Maxx wanted to be a part of the process and design the emblems himself. I really do have trouble leaving something like that entirely to someone else, it's the control-freak in me. But they were mostly his design with a bit of a tweak here and there from me.

DSCF1498

Noah wants me to make super-hero capes for Uncle Ben and Uncle Al, too. If only I had all the time and money and resources to make everything I wanted to before Christmas...

DSCF1497

Anyway, I'd better get back to it, there are still plenty of Christmas gifts still to make!

Monday 19 December 2011

With Bells on their Toes

DSCF1496

I spent a fair amount of time last year trawling Etsy and Made-It, looking for just the right pattern to make some lovely elf-stockings. This year, I googled, and found this amazing free tutorial.

DSCF1490

Instead of the appliqué monogram in the tutorial, I used my embroidery machine to put their names on felt, which I then appliquéd onto the stocking with blanket stitch. In addition to the instructions, I also added some bells to the toes, which I think adds a nice festive touch. Despite the fiddly-ness of the operation, I think sewing on 18 little pompoms was well worth the effort.

DSCF1492

I also added a lining. The original pattern has no lining, so the stuffing is accessible at the bottom of the stocking. I used the stocking pattern to fashion a lining, chopping it off just below the ankle and adding a bit of a rounded edge. I stuffed the toe before adding the lining to the inside of the stocking. I basted the top edges of the lining and stocking outer before adding the cuff. You could still pull the lining out, but not the stuffing, which is what I wanted to achieve. I also under-stitched the lining so that stays nice and neat and doesn't pop out of the top of the stocking.

DSCF1491

They have Noah's approval: "I really do luff it a lot".

Hopefully they will get used for many years to come.

Friday 16 December 2011

Tutorial: Appliqué

DSCF1482

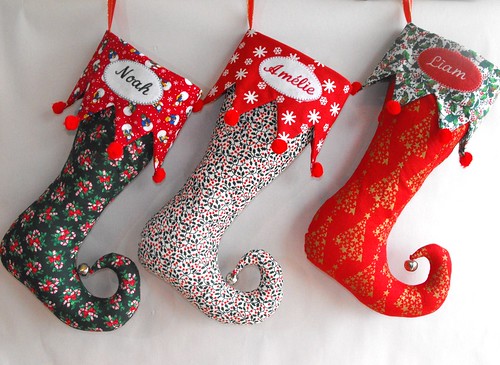
As promised, I am back with my appliqué tutorial. I will apologise in advance as it is very wordy and quite picture heavy. The appliqué I am showing you is part of my Christmas bunting project. 


DSCF1409
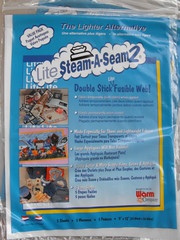
To appliqué following this method, you will need some fusible web. I like to use Lite Steam-A-Seam 2. Steam-A-Seam 2 is a double sided fusible web, sandwiched between two sheets of paper. It is designed particularly for lightweight fabrics.

There are heaps of similar products on the market you could also try. I prefer Steam-A-Seam 2 because the paper backing stays on well, and the webbing sticks lightly to the fabric before you press it with the iron, so things stay put a little better but you are still able to re-arrange things before you permanently affix it to your work with the iron. This makes fussy cutting and appliqué positioning very easy.

I purchased my Steam a Seam 2 from OzQuilts.

DSCF1410

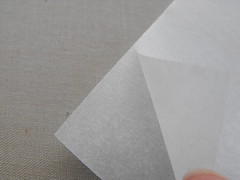
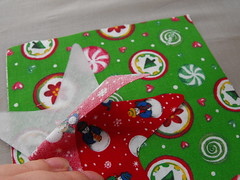
If you peel away a corner, you will see that between the two layers of paper, there is a layer of fusible web. This web will be sticking to one piece of paper more than the other. This is the sheet that you want to trace onto, as the other sheet will be peeled away.

DSCF1412


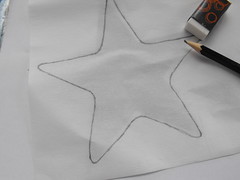
You will need to trace a mirror-image of the final appliqué because this will be sticking to the back of the fabric. One thing that you can do, is trace it the right way around on the paper that you will be peeling away, and then trace that line onto the liner with the fusible web on it.

DSCF1413

Once you have traced your design (remembering that it needs to be back to front and on the paper that will be peeled away first), you need to roughly cut out your design, leaving some excess paper around the edges. This will ensure that you will have webbing right to the edges of your applique.

DSCF1415


Press the fabric that you are planning to use for your appliqué design. Press it from the back, so that you don't have to flip it over and you can then keep it flat, ready for the webbing.

DSCF1414


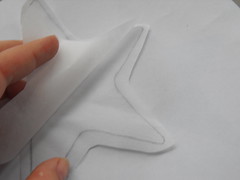
Peel away the backing, ensuring that your traced design stays on the paper that is still attached to the webbing. Peel away carefully, so that if you notice the webbing is attached to the wrong sheet of paper, you can fix it before it's too late.


DSCF1416

Position the webbing so that you are happy with the placement of the fabric within your design. If you are using fabric with a large motif, or a design that has a definite right-side up, then you might want to move it around a bit until you get it right. The webbing will stick a little, but is easily lifted and moved around. Once you are happy, give it a good press with the iron to bond the webbing permanently with the fabric. A good 10-20 seconds on cotton setting with some steam ought to do it.

DSCF1417

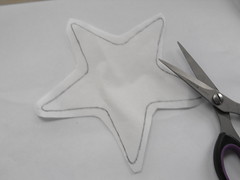
Roughly cut away the fabric with the design on it, ensuring that you keep all of the paper intact. You can now store away the remainder of the fabric, knowing that there is no sticky webbing left on it to ruin your next project, or make a mess of your iron.

DSCF1419


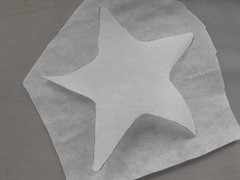
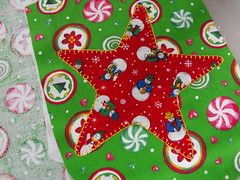
Now, trim away the excess fabric, carefully following the outline that you traced on the fabric.


DSCF1420

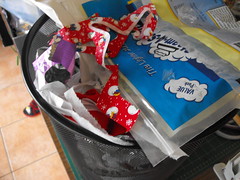
And throw the waste edges into your over-flowing bin. Your bin is over-flowing, right? Mine is. It's also sitting up on a table right now, away from small children who like playing with fabric scraps.

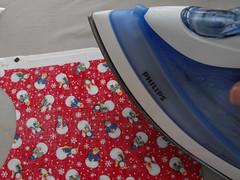
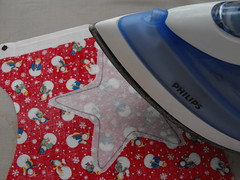
Give your main or background fabric a good press, this time from the right side, as we want a nice smooth surface on which to place our appliqué motif.

DSCF1422
Peel away the backing from your motif, ensuring that the sticky webbing is adhered to the back of the fabric.


DSCF1424


Place the appliqué motif face-up, on the backing fabric, moving it around as before until you are happy with its position. Give it a good press with your iron to bond the appliqué permanently to the fabric.

DSCF1425
Take some tear-away stabiliser, larger than your motif, and place it on the back of the fabric. You might like to hold the fabric up to your sewing machine light, or a window (during the day-time)  to make sure that the stabiliser covers all the edges of your motif.

According to the instructions that came with the Steam-A-Seam 2, the paper backing can also be used as a stabiliser. I have heard of other people using baking paper as well.

Stabiliser is used to keep your fabric nice and stable whilst you stitch it.Without stabiliser, your fabric can stretch and skew and warp out of shape. You want your fabric to stay nice and flat and not become a lumpy, bumpy, three dimensional mess when you're finished.

There are different kinds of stabilisers, some can be ironed on so that they don't move at all whilst you are stitching, some can be disolved away with water and are great for things like lace making. The one I use can be torn away when I'm finished so that the fabric returns to its original, flexible shape once it is finished.


Choose a nice, decorative stitch on your machine. I chose to use blanket stitch. When I was looking to replace my sewing machine, a year and a half ago, blanket stitch was highish on my list of priorities. This is the first time I've really used it since I tested it before and after I purchased the machine and I'm pretty happy with it.

DSCF1428Test the stitch on a scrap piece of fabric before you start sewing on your design. I used some nice shiny machine embroidery thread on my design, along with a bobbin thread that I normally would use on my embroidery machine.

When I tested my stitch on the scrap fabric, I decided that it needed to be wider, so I made that adjustment. I also found there were a few loopy bits of thread from the back showing on the top. I loosened off my  top tension a little, and this fixed the problem.

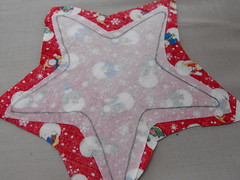
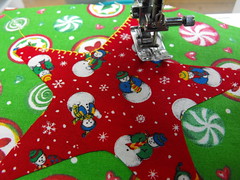
Now, flip your fabric to the right side, with the stabiliser underneath and the appligue on top, and get stitching!


DSCF1429You will need to be careful when you are turning corners with decorative stitches like blanket stitch, my machine does a series of stitches like forward-backward-forward-left-right-repeat. You really need to be stopping and pivoting, with the needle down both before and after it does the left-right bit so that it makes a nice neat turn.

DSCF1430


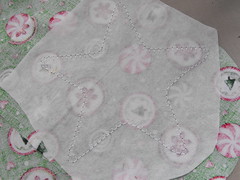
When you flip your fabric to the back, you will see your stabiliser all nicely stitched to the back of your design. Hopefully, everything is all neat and tidy like mine is here.


DSCF1432

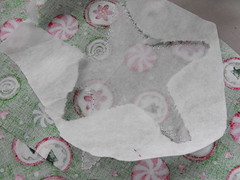
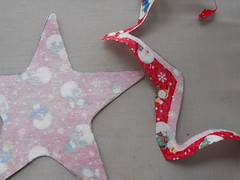
You can now carefully tear the stabiliser away from the outside edges of your design. You can tear it away from the inside edges too, if you like. If you used paper, and you are planning to ever wash the finished project, I would strongly recommend that you do remove it all.


Your appliqué is now complete - now you can get on with the rest of your project!

DSCF1453


Please let me know if this tutorial is useful to you, or if you have any feedback. I would love to know what you think.

Wednesday 14 December 2011

EBDQS - Quilt received!

Doll quilt received - front

This is the quilt I received from Rose in the Doll Quilt Swap. I love the colours Rose has used, especially the rose and turquoise. The coloured dots on the background fabric pick up the other colours in the quilt. The pieced stars are fantastic - I would like to try something like this myself one day. She has also used a lovely, textured fabric for the backing, which gives the quilt a more luxurious finish.

Doll quilt received - back

Thank you Rose, the quilt is beautiful! You have a very grateful quilt recipient here!

Monday 12 December 2011

Run, Run, As Fast As You Can!

DSCF1474

You can't catch me, I'm a Gingerbread Man!

After years of wanting to, I finally made one of these.

Sunday 11 December 2011

Christmas Bunting

DSCF1453

I've finally managed to complete a Christmas decoration! I've been meaning to make some Christmas bunting for years, and I've finally gotten around to it. I used the blanket stitch on my sewing machine, along with a bit of machine embroidery thread. If you want to know a little bit about appliqué, I should hopefully be back in here in the next couple of days with a tutorial.

Thursday 8 December 2011

You Sew, Girl! - Wrap Skirt

DSCF1404

I picked up this Echino Chelsea fabric for only $10/m during Frou Frou's closing down sale. Which is good, because I got a bargain, but also sad because it's another great fabric store that is no longer around. The fabric is double-gauze, which is lovely and floaty and soft. Perfect for summer weather.

DSCF1407

I didn't use a pattern as such, I followed Nikki's instructions in the pattern-free clothes section of her book, You Sew, Girl! I think the skirt is better suited to a more structured type of fabric (like a quilter's cotton, or maybe some linen), but I think I got away with using the gauze for this project.

DSCF1406

The fabric was really narrow, so in the instructions, Nikki advises a centre-back seam as an option, but I wanted a fairly long skirt and the longer it is, the wider it is at the bottom and it was just a little too narrow. I also wanted my lions to all be the right way up, so I ended up making it with two side seams instead.

DSCF1402

The only thing with this was that I'm not really sure I had the grain of the fabric right on the two over-lapping front panels. My concern about this caused me to procrastinate a lot, and this skirt ended up taking me a couple of weeks to finish, which is silly because it is not really that complicated.

DSCF1395

The skirt has a facing around the waist-line, and along the front edge of the skirt, which takes a little more time than this skirt, but makes for a much better finish.

Tuesday 6 December 2011

Resistance is futile!

DSCF1391

I became really excited when I saw that the next Aneela Hoey fabric line for Moda was going to be based around my favourite little fairytale girl, Little Red Riding Hood. I really like her girl on a tree-swing from the Sherbet Pips range, but as yet I don't have any. The new line is called "A Walk In The Woods" and is due for release in February or March.

DSCF1393

I became even more excited when Amy Badskirt told me that Quilt-Jane had pre-cuts in her store. The prices are also AWESOME! I couldn't decide between the jelly roll or the layer cake. I put one of each in my basket and they both sat there for a weekend whilst I ummed and ahhed and finally decided I had to have both.

DSCF1385

They are destined for a quilt (and probably some other things...?) for Amélie's room.
Blogging tips