Monday 31 October 2011

Nut Loaf

DSCF1244

I use special nut-loaf tins to make this. If you don't have the proper tins, I have heard that you can use a fruit juice can (eg pineapple juice) and cover the top with foil. This makes two nut loaves, so you will need two tins (or fruit cans).

1 cup chopped dates
½ cup chopped walnuts
½ cup sultanas
1 cup brown sugar
1 teaspoon baking soda
½ tablespoon butter
1 cup boiling water
2 cups plain flour
½ teaspoon salt
1 egg, beaten

Combine the dates, nuts, sultanas, sugar, baking soda and butter.

Pour over the hot water, mix and then add flour, salt and egg.

Mix only until well blended with a wooden spoon.

Place in two well greased nut loaf tins, replace lids and stand upright in oven at 180C (160C FF) for 50-60 minutes.

Slice and serve with butter (or not).


Liam helped me to make the nut loaf today...

DSCF1230

When did he turn into such a big boy?

DSCF1231

He helped to grease the tins

DSCF1236

He stirred...

DSCF1237

When you grease the tins, line the base with baking paper. Use baking paper. I used to think grease-proof paper was baking paper, but baking paper is WAY better.

DSCF1238

Ready to go in the oven!

Sunday 30 October 2011

Finally Made It! Hellooo Leather City!!!

DSCF1213

I finally finished my red leather City bag. There were lots of tense moments. Some skipped stitches, knots, a broken needle and I even managed to steam myself with the iron this morning. It was totally worth all the angst though, as I have achieved my goal to make this bag in leather.

DSCF1198

I decided that the side seams would look nicer with a bit of top-stitching, rather than just pressing them open. Every extra seam is a risk, especially top-stitching, as any seam that is un-picked will show as a row of tiny holes. I recommend that if you are top-stitching leather, that you ensure there is plenty of bobbin thread. I am glad I took the risk, as the finish is far superior to just pressing the seams open.

DSCF1216

Inside the bag I included the zipped pocket from the pattern instructions. This time I matched my zipper with the lining and pocket fabric. I used some of the same Ink & Spindle Bonsai fabric for the pocket as I did for the feature panel.

DSCF1218

I forgot to take pictures of the purse feet that I put on the last City bag I made. The purse feet will keep the base of my bag from being scuffed. I didn't follow the instructions in the pattern for the base, because they don't include purse feet, instead using this tutorial instead.

My straps were constructed differently to Nicole's instructions in the pattern as well. Being leather, I wanted to reduce a lot of the bulk at the ends where the rings were attached.

DSCF1209

I really didn't think that I was going to be able to sew the loops to the bag, because of all the bulk, but I managed to do it. I actually did this bit with the industrial machine turned off, and just turned the hand-wheel. It is normally quite difficult to turn, but I have found that if I push down on the pedal a little, this reduces most of the resistance, and the wheel turns easily. I also only have two hands, so when turning the hand-wheel with one hand, and holding my work with the other, that left me with no hands for the back-stitch lever. I got Noah to hold it for me. I would never get him to do that with the machine going, but he was quite pleased to be able to help me make a bag! I guess an alternative would have been to put a big book or a brick on the lever, but a brick wouldn't have been so proud to help.

DSCF1211

I was quite happy to find that I was able to line the zip up with the centre of the ring tabs much better this time around with the leather, even better than I did with the denim bag.

DSCF1207

Here I am holding my newly completed City Bag, just to give an idea of size. There is still one thing missing, I need to put in an order to Nikki for some zipper pulls for both of my City bags.

DSCF1224

Saturday 29 October 2011

Can't Stop

DSCF1198

I'm too busy to blog tonight.... top-stitching.

Friday 28 October 2011

The Sale Show

DSCF1183

I could have stayed home and done some sewing...

DSCF1189

But we went out instead.

DSCF1193

Thanks Uncle Ben for helping out with the dodgem cars.

DSCF1172

the kids had a blast

DSCF1176

most of the time

DSCF1175

Maybe we might do it all again next year...

DSCF1171

Thursday 27 October 2011

My Creative Space - Getting closer to Leather City

DSCF1167

I'm working on my red leather City bag today. I've had some interesting stops along the way. I broke a needle. I've had trouble with skipped stitches. I ran out of bobbin thread, half-way along a seam.... but it's coming together, and I am mostly happy with it. I have a strap that I'm pretty pleased with and the Ink & Spindle fabric that I have chosen to compliment the leather seems to be working out to be a nice match.

I have discovered that leather and double-sided tape really work well together, however, I'm not sure my machine likes it very much. Since the skipped stitches occurred right after the broken needle, I don't think it was blunt or bent (the usual reason for skipped stitches). I noticed the needle was a bit gummy, cleaned it up and it's all good again so I'm guessing that was the cause.

What's happening in your Creative Space?

Wednesday 26 October 2011

Jelly Slice

DSCF1203

I posted this image as part of wordless weekend some time ago. It was a bit of a tease, since I didn't post the recipe at the time (being wordless). Here it is again, this time with the recipe included.

Base
250g packet milk arrowroot biscuits
180g butter, melted

Filling
2 x 400g tins condensed milk
½ cup lemon juice
½ teaspoon finely grated lemon rind
1½ tablespoons gelatine
½ cup boiling water

Jelly Topping
2 packets red jelly crystals
450ml boiling water

1. Line a lamington tin with baking paper. Alternatively, you may wish to use a plastic slice container, lined with baking paper. The baking paper will help you to retrieve your slice from the container once it is ready. Prepare a level space in your refrigerator.

2. Use a food processor to turn your biscuits into biscuit crumbs, add melted butter and mix well. Press into your prepared tin/container and place in refrigerator.

3. Dissolve the gelatine in the boiling water. In a medium bowl, blend the condensed milk, lemon juice, rind and gelatine mixture. Give it a good whipping with the mixer to get a bit of air in it. Spread the filling mixture over the base mixture, return to refrigerator and allow to set.

4. Combine jelly crystals with boiling water. Stir to ensure that all the crystals have dissolved. Cool to room temperature and pour over the slice.

5. Refrigerate until set. Slice and serve!

Tuesday 25 October 2011

Zip Left, Zip Right

DSCF1062

It is always best when sewing zippers, especially when top-stitching, that you sew in the same direction from each side. My industrial machine has a left foot and a right foot. My domestic machine has one foot that does both sides. From memory, the industrial feet cost me $6 each a couple of years ago from here. The invisible zipper foot for my regular domestic machine cost around $20. Still totally worthwhile.

Monday 24 October 2011

Sharing the Gadget Love - Magnetic Pincushion

DSCF1116

I love my magnetic pincushions. I have three, all in different colours. I keep one by the iron, and one by the sewing machine and one where-ever I am cutting out. I swap them around, because the one by the sewing machine tends to get fuller, and the others get emptier. They are great because you don't have to stab anything with a pin, just sort of toss it in the general direction and the magnet does the rest. This means I can focus on my sewing and not have to worry about looking up to get rid of a pin. If you drop a bunch of pins on the floor, you can wave the pincushion over them and it picks them up.

DSCF1114

You will notice that I use berry pins. Some of them have bigger heads than the others. The ones with the smaller heads are glass headed, whilst the others are plastic. You can iron over the glass ones without melting them. The plastic ones melt and can stain your fabric.

Sunday 23 October 2011

Four

cake

Ok, so Liam's birthday was back in July - over three months ago! I was having issues with my camera - flat batteries mostly. I forgot that I had photos on my phone. They aren't very good, but still, better than no pictures at all... I made a chocolate cake, and decorated it with Kit-Kats and topped it with Smarties. Smarties are always popular around here.

four

We had a nice, quiet family birthday dinner at home with just the people who live here and Nanna & Grandad and Paige & Tess. Liam received his first two-wheeler bike which Grandad and I assembled. He also received a red car (the blurry part of the second picture).

Saturday 22 October 2011

Leather...

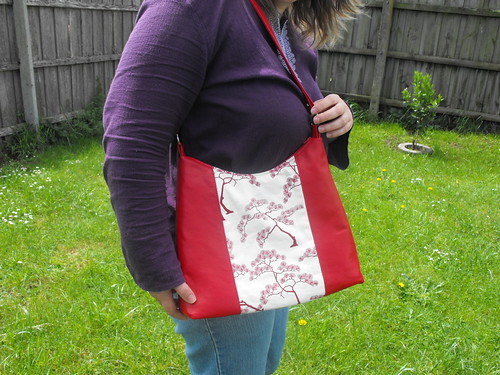
Leather is durable and beautiful. It's appearance is individual and unique. There is no grain that needs to be followed, thus bag pieces can be moved around to fit without worrying too much about which way is up. Some disadvantages are that it can be a bit bulky to sew, and care needs to be taken when cutting out, to avoid marks and holes. Care also needs to be taken to avoid creating new marks or holes when sewing it together.

DSCF1144

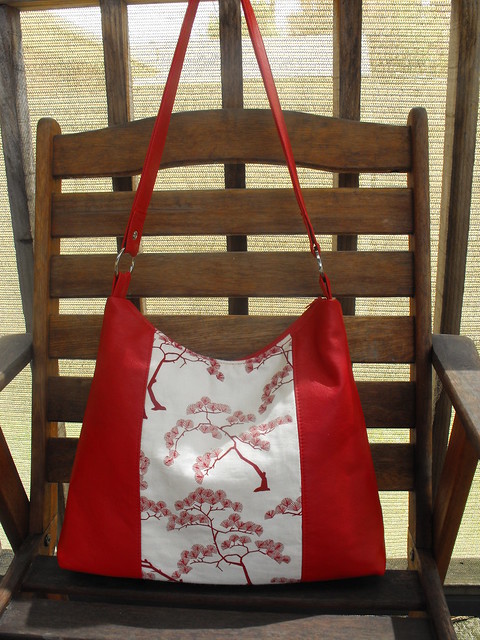
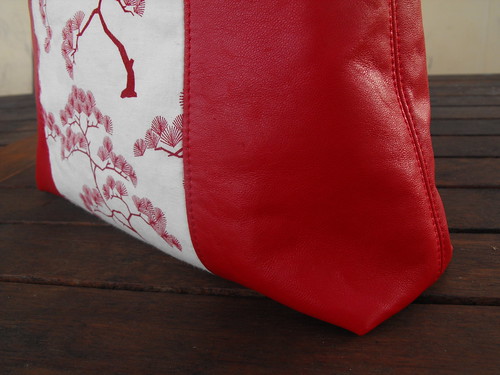
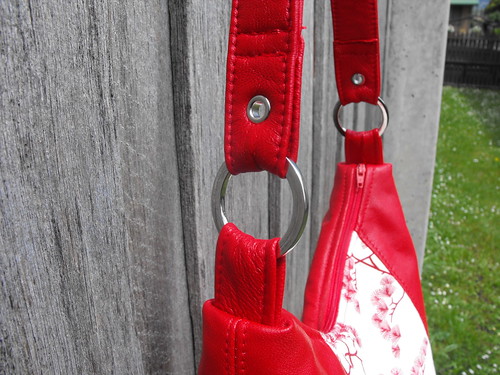
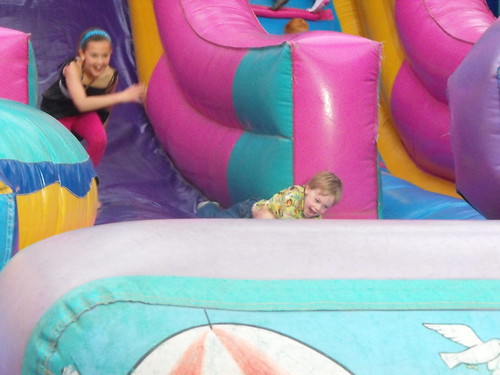
I am working on my strap for my red leather City bag. I had cut a piece of leather for the bag, and discovered it had some flaws, so have used it to make a test strap. Whilst the photo above looks great from the right side, you can see from the photo below, that it would not be strong and durable enough to be carrying around a largish handbag on a daily basis.

DSCF1146

The join would gape and wear and catch on things....

DSCF1147

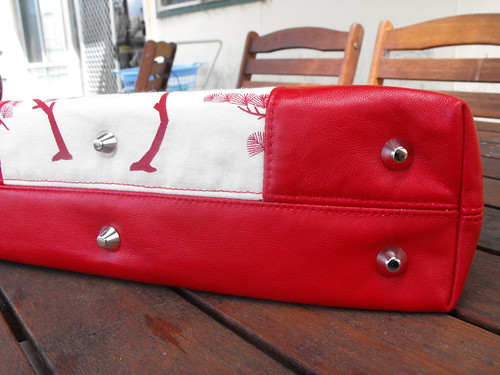
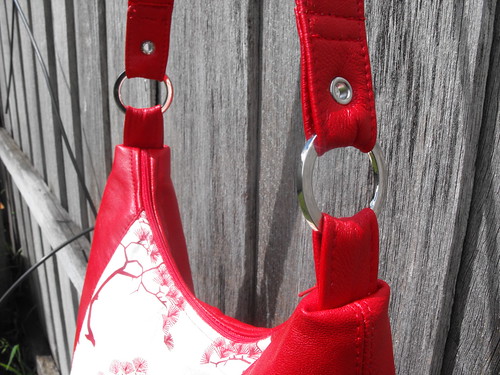
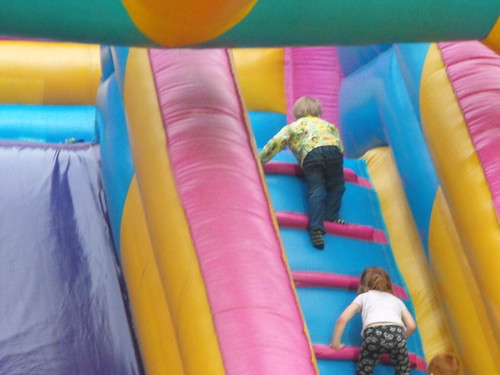
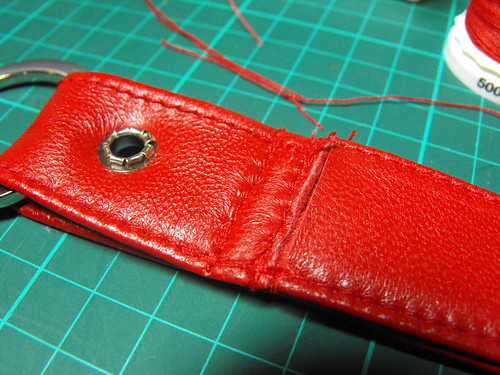
So I will go with an overlap underneath the stitching. Kind of like the image below. Only I will be more careful and neat and hopefully my thread will not break whilst trying to do it on the real thing...

DSCF1148

DSCF1149

A few things that I have learned whilst sewing leather...

1. Use heavier thread - I'm using Gutermann upholstery thread. It is heavier than regular Gutermann thread. A 100m spool of upholstery thread is about the same size as a 250m reel of regular sew-all thread.

2. Use a longer stitch length than usual. I usually use 3, for leather I use 4 (For stuffed toys I use 2.2, which is the default for my domestic machine)

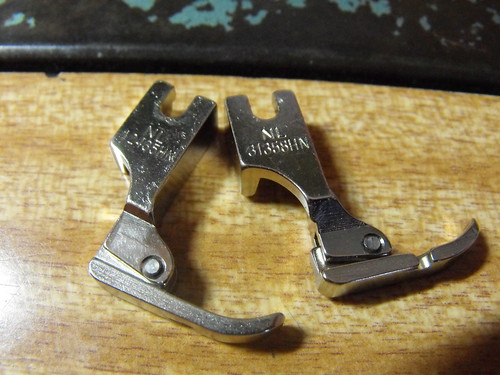
3. I use my industrial machine for leather, with a teflon foot, some people use a domestic machine and a walking foot. I have heard that the best is an industrial machine with a roller foot. Industrial machines are generally designed to one job well. I don't have the space (or money) for enough industrial machines to suit all my whims and fancies, so what I have will need to do!

4. With leather you need to sew it right the first time. If you make a mistake, and unpick it, you will be left with unsightly holes.

5. You cannot pin leather for the same reason. I would like to thank Amy Karol of "Angry Chicken" for this video "I don't pin, 'cause I don't want to" that encouraged my disdain for pinning as it is really helping me out now. I do use the odd bobby pin for bits where I am less than confident. Other people have suggested hair clips and bull-dog clips, but my bull dog clips have gone walk-about?

6. I discovered that the feed-dogs on my machine chew the leather a bit. It's not pretty. Reducing the foot pressure helps a little. Placing something between the leather and those nasty teeth also helps. I have been using the odd bit of tear-away. If anyone has any better ideas I would love to hear them. Most of the time, except for straps, the feed-dogs don't need to go near the top side of the leather anyway.

Friday 21 October 2011

Today...

I went to the library for story-time and picked up a crafty book that I had reserved. I will come back and do a review later...

DSCF1142

I received a little crafty mail.

DSCF1143

I went to my local fabric shop and bought some zips... why is it that I have a massive stash of zips, but I hardly ever have what I need and still have to go buy them?

DSCF1140

I did a little gardening in the vegie garden...

I cried for my friend who was called in for her lung transplant this morning, only to find the lungs weren't suitable after all.

....and I changed my blog header.

header3

What do you think?

Thursday 20 October 2011

My Creative Space - Leather City, Here I Come!

DSCF1120

In case you have come here from Our Creative Spaces and haven't been here since last week, you might not have seen that I finished my red leather spec case,

DSCF1040

and I also finished my bag.

DSCF1083

My plan now, is to make the same bag in LEATHER! My original plan was just to do the whole thing in leather, but seeing my denim one with the Ink & Spindle fabric, I want to achieve a similar look with the leather one...

DSCF1120

I have some more plans, down the line to mix these two up as well....

DSCF1123

If anyone was wondering, I get my leather from NSW Leather Co in Collingwood, and I get my bag patterns and shiny-bits from Nicole Mallalieu Design.

DSCF1079

You can see more Creative Spaces, over here, and you can join in with the Blogtoberfestivities over here.

Wednesday 19 October 2011

Ottobre Woman

DSCF1094

The last long-sleeved black t-shirt I owned, met with an unfortunate laundry accident shortly before we replaced our washing machine. While I was using mum's cover-stitch machine, I decided to make myself a replacement.

DSCF1085

Armed with Ottobre 2/2006 and some "Seaspray" from Spotlight I set to it.

A normal adjustment for me would be body length adjustment. I am not a tall person, but when sitting down, I am taller than most people I know. I really, really hate too short tops, so I usually add about 7cm to the length of almost every top or dress I make, so I made this adjustment to the pattern. It should be noted, that the length on most tops doesn't change by more than a couple of centimetres from the smallest size to the largest size.

DSCF1084

I often lengthen sleeves too, but I held the pattern piece up to my arm before I made it, and felt that the sleeve was adequate, which it was. Love having sleeves that go all the way to my wrists - luxury!

DSCF1087

If you look at the pictures, you can see that the top is of a very generous length. I probably could have gotten away without the adjustment, but it is nice to have a top that covers my midriff, and it also doesn't ride up, due to the shaping in the pattern. Whilst I can see that the fit isn't perfect, it is about 1000 times better than anything I can buy in the shops, so worth the trouble of making it. I might have to start making myself some summery tops though, as it is a little warm for this sort of attire at the moment. Lucky for me, there is a short sleeved version and a v-neck as well if I want to go that way.

Tuesday 18 October 2011

Wren City

DSCF1081

This is what I have been working on over the past few days. The pattern is Nicole Mallalieu's City Bag, and I used some of my precious "Wrens" Fabric by Tegan Rose for Ink & Spindle. I've teamed the Wrens fabric with some denim that was in the same dark inky colour.

DSCF1082

This is the first proper bag I have made on the industrial machine. I am actually surprised with how easily it came together. I guess all the practice with the machine has actually paid off. The magnetic seam guide helped a little, too!

DSCF1083

I even managed to insert a zipper on a curved seam, and an internal zipped pocket with no dramas!

DSCF1077

The bag wouldn't be complete without a bit of bling, and I was really undecided whether to go with my usual choice of silver, or if I should go with the brassy rings and feet to go with the natural tones of the Ink & Spindle fabric. I'm glad I chose silver, it's so shiny!

DSCF1079

I have spoiled myself with an internal zippered pocket, using more of Tegan's Wren fabric. It's so beautiful, and only I will see it in there, but the bag is for me, so why not?

DSCF1080

The next bag I plan to make is leather.... wish me luck!
Blogging tips