Monday 27 October 2014

Holly Sea Princess

Holly Sea Princess Cardigan

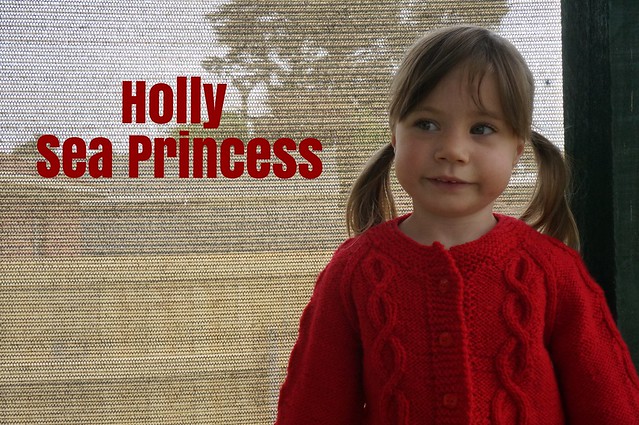
Kids' Clothes Week just ended and whilst I didn't do much in the way of sewing for my kids, I did get some knitting done. I spent at least an hour a day for the first four days of the week, and finally completed this Sea Princess cardigan for Amélie. The Sea Princess pattern by Elena Nodel, is available from Ravelry, and I recently discovered it is also on Craftsy*.

Holly Sea Princess

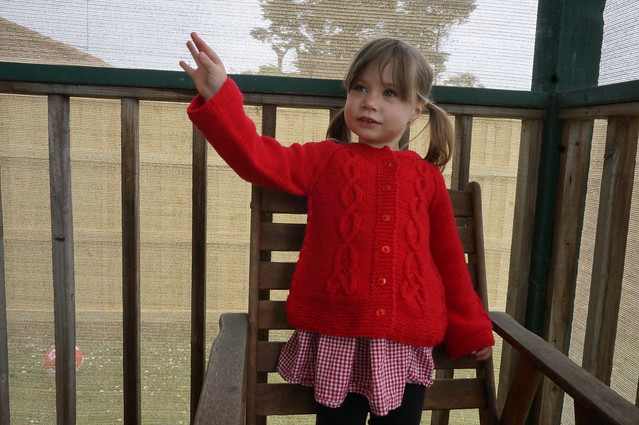
The pattern comes in sizes from six months through to nine years, and has quite a few options including double or single breasted, different sleeve lengths and shapes, as well as variations on how elaborate the cabling is. I chose long sleeves with the elaborate cables and just one row of buttons. I particularly love the detail on the back.

Holly Sea Princess back

I knitted the cardigan on my Knit-Pro interchangeable needles from the top down. You knit it all as one piece, so there is no stitching up at the end. It starts below the neckband, and you knit front panel, shoulder, back panel, shoulder, front panel. You keep knitting, back and forth with some increases until you get to the underarm point, where you slip a bunch of stitches off onto a stitch holder for the sleeves, and then join the front and back panels together at the sides. There is a twisty cable that runs down the side "seams" between the front and the back. After you have completed this, and bound off at the bottom, you go back and knit the neckband, and then you knit the remainder of each sleeve in the round. All there is to do after casting off is to tidy up a little under the armpits and weave in all the ends. You can save yourself some trouble by knitting half of those ends in as you go. One of the fun things about knitting on interchangeable needles is that it is easy to try on as you go.

Sea Princess

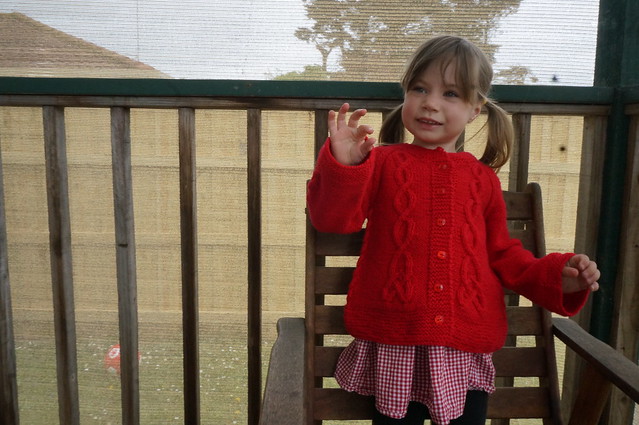
I used Bendigo Classic 8-ply in Holly to knit this cardigan. It comes in 200g balls, and I used about one and a half balls, leaving me 123g of yarn to knit something else. I might mix it up with some grey and knit some stripy hats. We will see. The yarn is only $12 a ball, so quite a reasonable price for good quality yarn.

Sea Princess - button

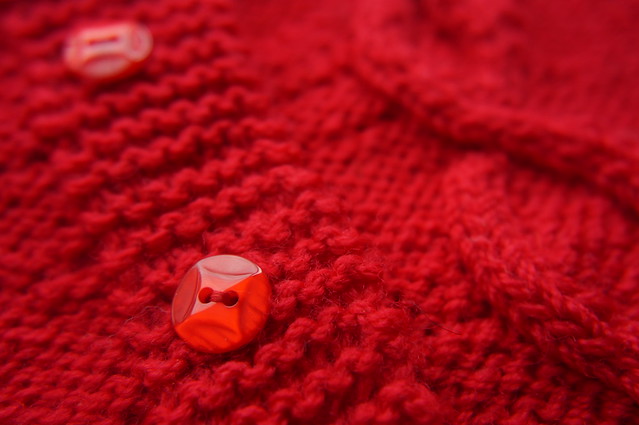
When I finished knitting, Amélie and I went to the shop and chose some buttons. I picked up some that were red with teddy bears on them, but she wasn't interested in those. It is clear that she has more sophisticated taste than that.

*Affiliate link

Monday 20 October 2014

Winter Flat Cap

Flatcap

When I made Maxx's coat, I had some leftover fabric, so I made him a matching flat-cap using Nikki's "You Sew, Girl! Flat-cap" pattern. I cannot believe it has been almost two years since I made his last flat-cap. This one is warmer for winter than the last one.

Despite the heavier fabric, this hat was much easier to put together than the last one was, and sewed up in no time. I also have a couple of these cut out ready for the boys.

Thursday 16 October 2014

"Well, hellooooo there!"

Hello!

said the giraffe, "Please do come in!"

I've had this post sitting in my drafts for a year, and just now, I saw that my friend Rachel had posted her about the quilt a year on, and thought I should finally share this.

Some friends and I secretly made our friend Rachel a quilt for her new baby. We started not long after she announced her pregnancy, so whilst she was busy baking a beautiful baby, we were conspiring to make him/her a beautiful quilt. The block above is the one that I made. AJ is the real hero, she put all those very different blocks together and made them into a beautiful quilt.

Monday 13 October 2014

Poor, Neglected Maxx

Albion Coat Profile

Maxx always seems to miss out. The truth is that men's clothes tend to require more time and more fabric in less exciting colours. The end result, though, is always worthwhile, and when I do make things for him, he really does appreciate it. If he wasn't into hats though, he wouldn't get much.

It took me ages to find fabric to make this Albion coat. I had the pattern in my hands for some time before I was able to find suitable fabric. Having said that, I can't say that it was particularly suitable. The fabric was from Spotlight, and I would suggest that unless you are planning to make a heavy, army style blanket, then maybe bypass it. Maxx assures me that the coat is comfortable, but it is very heavy. Almost 3kg. I can't say I was overly impressed with the range of wool fabric that Spotlight had, considering it was meant to be on sale. There was a total of 6 bolts there, three of which were light grey (two the same with sparkles, the other without), this olive coloured one, a dark green plaid and white. So olive it was, and lucky it's a colour he likes. I was happy to find a matching bemsilk to line it with. The pattern suggests flannel lining, but with fabric this heavy, it would be too much. Plus, bemsilk makes it easy to slip over other clothes.

Albion Coat Front

So, 3kg of coat is quite a bit to be lugging around the sewing machine, but I powered on. Since it was a birthday present, the coat was made mostly in secret, whilst Maxx was at work. I encountered some real difficulty when it came time to sew on the toggles. Large bulky coat needed to be able to be turned around under the harp of my machine, which was quite a squeeze. The weight of the coat threatened to drag my domestic sewing machine right off the table whilst I sewed, so it was hard yakka. There was much unpicking and swearing and in the end I got there, with the help of my trusty fabric glue pen, and my industrial sewing machine (with it's heavy table, and bigger harp) and they look fabulous! The toggles were made by hand, using leather scraps in just the right colour from my stash. I feel that the kits with the black toggle cover things would not have suited. I used a letter D from my big box of biscuit cutters as a template for the toggle covers. I managed to find some cord in just the right colour at Clegs in the city when I was there for Nikki's Book Launch, and the toggles themselves were from Spotlight.

DSC01720

I had originally intended to use buttons to attach the hood and sleeve tabs, but decided that it was unfair to expect my sewing machine to sew buttonholes into that bulky fabric and went with some brassy jeans snaps instead. I added some to the pocket flaps as well, for good measure. As well as being hardwearing, and looking fabulous, the jeans snaps were a much more affordable choice. Many of the buttons that I liked at Spotlight were $6 each. It would have cost me almost $50 for buttons (not including toggles). How ridiculous!

DSC01711

Apart from fabric woes, the pattern itself is pretty awesome. There are some great details, and whilst the pattern is quite extensive compared to the regular commercial patterns, there are even more great hints and tips on the sew-along. I also have the Walden Negroni pattern waiting for me to make Maxx a shirt (one day, I promise!) and I must say, they are the most attractively packaged patterns I have ever bought. I should also add that I am super impressed with my service from Sew Squirrel so far, my patterns have been posted to me super-quick. The Negroni pattern was ordered on a Saturday morning, was posted that afternoon and arrived Monday in rural Victoria!

Monday 6 October 2014

Made for Me - April Batwing Top

DSC01437

I originally made New Look 6648, view A in January, this time I decided to make view B with the batwing sleeves which is more suitable for the cooler weather. This time the fabric was from the $2 rack at Darn Cheap Fabrics in Glen Huntly. I was lucky to have found it, as the fabric was rolled with the "pretty side" facing inwards. The outer side, with the pretty sparkles was hidden inside the roll.

DSC01257

I encountered an interesting problem when laying out the pattern. My fabric was only about 130cm wide, which is wide compared to many woven fabrics, but most stretch fabrics are closer to 150cm. It seems I wasn't the only one who had issues with the width of the fabric. When I made a little post on facebook about it, it turned out that Lara was also making a (different) top, using the exact same fabric! With the batwing style sleeve, the front and back pattern pieces are quite wide. When I laid this pattern out, I realised it was not going to fit. I decided to cut the sleeves a bit short, and add cuffs to the ends. I made the cuffs the same way that the lower band is made, with gathered seams.

DSC01438

One thing that I do find a bit irritating with the top I made in January, is that even though I made the neck opening narrower and deeper, it is still "a bit flashdance" and falls off my shoulder from time to time. I wanted to avoid this and really brought the neckline in on this top. Then I did my neckband differently to the instructions and mitred the centre front instead of the way the pattern has you do it. I feel I did make the neckband a little short, as it brought in the neckline even more, it is very modest, but being an autumn-winter top, this keeps me warmer - better than having a top that falls off the shoulders when it's freezing outside.

Blogging tips