Showing posts with label Noah. Show all posts

Saturday, 31 May 2014

3 Easy Steps to Make Better Bags

Toronto Convertible Tote-backpack

Step one - GET THIS BOOK!
Step two - read it
Step three - make all the things!!


The Better Bag Maker Book

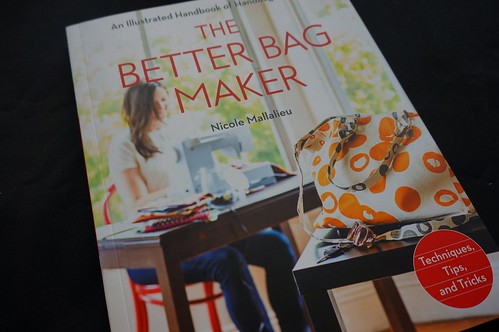
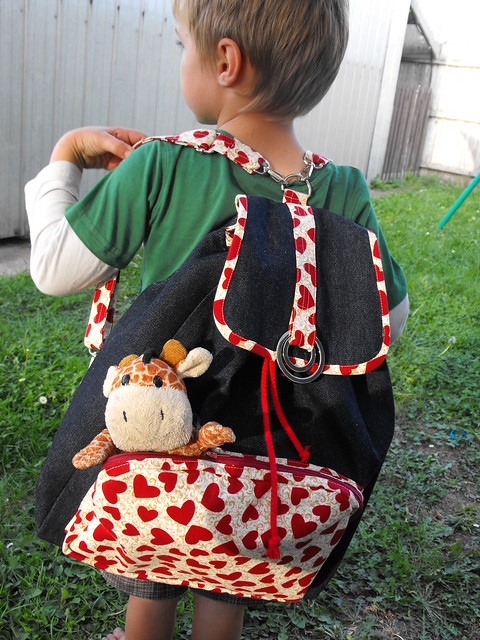
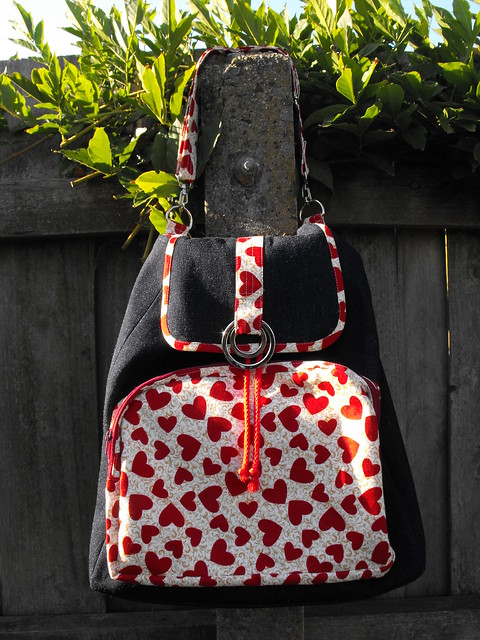
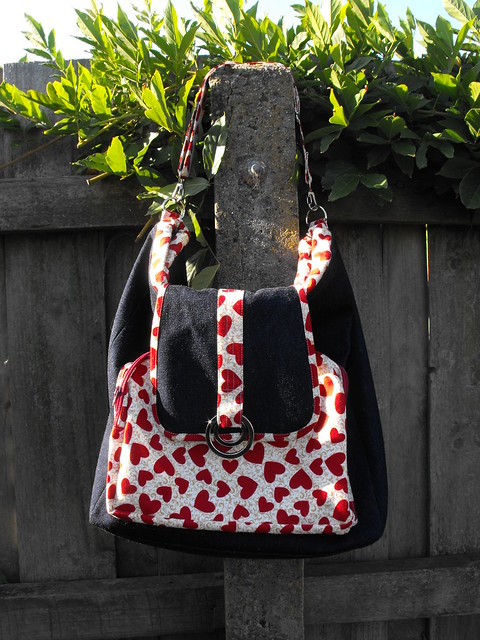
Nicole Mallalieu's latest book is hot off the press and oh boy, is it a good book or what?!! The book comes with the patterns you need to make ten different bags graduating from a basic tote at the start, right through to the fancy-schmancy Toronto backpack as you can see above. I made this backpack about a year ago as a pattern test for the book. It is a really versatile bag, as it converts from a handbag style that you can pop under your arm, to a tote so you can fit in a little more shopping, and then, when you've been at the craft show all day and you're running out of hands to carry all your shopping, it can convert to a backpack!

Toronto as a tote

But ten great bag patterns isn't even the best bit. The part that you will really be loving is the bit right at the start, where Nikki tells all of her best bag-making secrets. Since I started using Nikki's patterns, and learning all her clever tricks, I really feel that my sewing has improved by leaps and bounds. The Better Bag Maker covers quite a lot of the techniques that Nikki uses in her patterns, all in one place. This book tells you how to make professional looking straps, crisp corners and insert zippers like a pro. Nikki shows you how to choose interfacing, as well as how to apply it. You also learn how to install all the yummy metal bits, like magnetic snaps, o-rings and purse feet, that take your bag from homemade to hand made. There are also plenty of different pocket options so that you can make your bespoke bag work the way you want it to. The best part of all this, is that you can use all these great tips on all your other sewing and make everything you do look more professional!

Toronto as a shoulder bag

I am so pleased to have this book on my bookshelf, it is a great reference to have and I have already used it to help me install a professional looking zip pocket inside my latest bag, but that's another blogpost!

Sunday, 23 February 2014

Back To School

Noah's Art Smock

Noah started school this year, and I must say that he has taken to it like a duck to water. Only he isn't water-proof. Or paint proof. So I made him this art smock. I used the "Don't Look Now" art smock pattern, just as I did last year for Liam.

Pencil - pencil case

This year, Liam was able to use the same Art Smock, but he needed a new pencil case. To start off with, I made this pencil case, using this cute tutorial from Gwenny Penny. Whilst it is a cute pencil case, it is far too small for Liam's needs...

Liam's Pencil Case

...so I made him another one in a more suitable size. I didn't use a tutorial for this one, and pretty much made it up as I went along. There is plenty of room inside this one for all his pencils and textas.

Pencil Case - front zipper

The pencil case features an extra pocket on the side for all those little bits and pieces, such as his eraser, sharpener and his black-lead pencils for writing, whereas all his coloured pencils and textas can go inside the larger section. I think it would be nice to have a go at upsizing the other pencil case for Noah for next year when he needs a pencil case.


Pencil Case - inside

Wednesday, 2 October 2013

Noah is Five

Noah is 5 collage

To celebrate Noah's fifth birthday, I made him this cake. It was inspired by this one that I found on Pinterest. The main cake was chocolate cake made from scratch, and the cake pops were made with red velvet cupcake mix and dipped in white chocolate. Coating cake pops in chocolate is trickier business than you would think, but they do look much better when you coat them with sprinkles, and I did that with the rest of them, but never thought to take a photo of those!

Noah's 5th birthday cake


Noah is adventurous and observant. He loves gadgets, accessories, and exploring new places and things. He likes batteries and screws and pulling things apart. He is funny and caring and a great hugger. I do think that one day (if we can keep him out of danger) he will be an amazing man.

Happy Birthday Noah


Monday, 20 May 2013

Fancy Flappy Welt Pockets

DSCF2574

You might remember this pattern from before. It's the Ottobre Relaxed Cotton Pants from the Spring 2013 issue. I made Liam some school pants, using some gabardine back in March.

DSCF2569

This time, I decided to include the fancy welt pockets on the back with the flaps. Instead of making button holes and sewing on buttons, I've used my snap press to apply some jeans snaps. I love the way they turned out, don't you?

DSCF2570

DSCF2572

I also think I may have mastered the fly, although there is a mistake here, can you tell what it is? Clue: these pants are for a boy! Yes, I have the fly back to front, just like Lauren did in The Great British Sewing Bee. I am sure that I followed the directions properly for the fly shield and that dictates which way the fly goes, so I am not sure what went wrong there? Anyway, the fly still works, I doubt anyone witll notice, but next time I will be looking carefully at which way everything goes before I start to put it together.

DSCF2568

Oh, and I used a completely different technique for putting the fly together this time too, and I think it really made the whole job way easier and quicker. I watched this video, by Sandra Bezzina on how to insert a fly, but I put the fly shield on first, and just flipped it out of the way as I sewed the rest of the zip (there is no zipper shield in this video) and then flipped it back when I did the bar tacks.

DSCF2567

The fabric I used was the stretch drill that mum got for me recently. It is quite sturdy, and has a really good stretch to it. Perfect for climbing all over the play equipment at school as Noah demonstrates here. These are actually Liam's pants, but it was tricky finding time to photograph him in them when the light was right, so Noah is my model.

DSCF2566

I also made Liam this windcheater. It's not exciting enough for a whole blog post, so I will pop it in here. I just used a pattern from the Kwik Sew, Sewing for Children book. Between the pants and the windcheater, I estimate I used about seven fat quarters.

YST13 Running totals: in = 172, out = 51, total = +121 

PS. If you would like to add more fabric to your stash, then I suggest you enter my giveaway. There's a rainbow felt pack and an Anne Kelle FQ pack up for grabs!

Friday, 19 April 2013

Monkey Mayhem!

Ninja monkey

I've been pattern testing!

If you've never heard of Jodie from Ric-Rac, then you should know that she is one of the most awesomest blogging toy pattern maker extraordinaires that there ever was. You should totally check out her blog - Go on! I'll still be here when you get back. If you ever remember to come back, that is.... Her patterns are easy to follow and the results are so loveable that you will be unable to resist, just as I was totally unable to resist this guy. He has evolved quite a bit since he first appeared on Jodie's blog, but the striped fabric really brought out his personality. Jodie has named him "Louie, Monkey of Wonder", but around these parts we call him Marvin, or sometimes just monkey.

Of course, Noah needed a matching mask

When I first saw him, I just KNEW that Noah would love him. I mean, this monkey is not just cute, he's a bit naughty too! You can tell from his cheeky face that this guy is BIG trouble! A lot of Jodie's toys have button jointed legs, but not Louie/Marvin/Monkey. Whilst his arms are button jointed, his legs are put together in such a way that he has a spring in his step and he also has a definite sway in his tail. When he wears his super-hero cape and super monkey jocks, he is ready to save the world. Nobody will know who he is, as he wears a special mask to protect his identity. I also made a mask (not part of the pattern) to protect the identity of his favourite side-kick.

Best buddies

Louie/Marvin/Monkey runs on raspberry icy-poles and has boundless energy, just like my Noah. I can tell that they are going to be the best of friends for a long time, they've been hanging out together all the time over the past couple of days.

Sleeping Monkeys

If you want a monkey like this of your very own (or know a small person who might), you should be able to get your hands on the pattern very soon. He's coming soon to a pattern dealer near you! If your local quilt shop doesn't stock Ric-Rac patterns, you should ask them to get them in, they are totally missing out.

Wednesday, 27 March 2013

School Pants

DSCF2526

I had a bit of left over fabric in my stash from some time ago, I think it is gabardine? Liam was also in need of school pants. Since there were none left in the shops in his size, the solution was obvious.

DSCF2529

I used the "Relaxed Cotton Pants" pattern (19) from the latest Ottobre magazine (Spring 1/2013). The pattern has elastic in the back, but is flat at the front, which gives them a nice, tidy, but comfortable fit. I didn't bother with the back pockets, I cut the pants shorter so as not to bother with the turn up hem, and I used a jeans snap instead of the button and buttonhole. I still need a bit of practise perfecting the fly - I don't know if I am doing it wrong, but the fly shield in these patterns always seems a bit short to me, even though I add seam allowances? Is it just me, or does the fly seem a bit short as well? I would love if anyone else with more experience has some advice or suggestions? This magazine has some really nice jacket patterns both for boys and girls that I would also like to make.

DSCF2523

Noah wanted to have his photo taken too. When my boys are sitting down, Noah is taller, but Liam definitely has the longer legs. Maybe I might regret not having the extra length later on in the year?

SYST13: I used about 4 fat quarters of fabric from my stash for this project.
Running totals, in = 103, out = 38, total = +65

Wednesday, 10 October 2012

10 Kids Clothes Week Day 3

upload

Karen over at And So, I Sew is hosting the Great Pattern Destash. This is not about getting rid of patterns, it is about freeing them from the packet, and using them for their intended purposes! If you've got patterns, stashed away, never seen the light of day, then you might want to pull some out and dust them off and get sewing. I'm going to commit to using three patterns from my stash this month. What about you? Pop over and let Karen know that you're going to join in.

upload

I've started with this "Snappy Tie" Creative Card by Make It Perfect. My making this was actually a compromise. Noah and Amélie were both having afternoon naps and Liam wanted me to play Mario Cart with him. I wanted to sew. I was sew not interested in playing video games. So I suggested we make him a tie. It was a quick enough project that I was able to hold his attention for long enough to make it.

upload

And of course, because I made one, I must make a second (and potentially a third, we'll see how we go). Noah and I made this one this one this morning, whilst Liam was at Kinder and Amélie was napping.

Tuesday, 2 October 2012

2. That's what little boys are made of

Liam & Noah frog hats

Before the dead-line, I managed to scrape in two more hats. There is nothing like leaving things to the last minute! Of course, I once again used Nicole Mallalieu's (You Sew Girl) Kids' Hats Pattern. I should mention that if you are looking for options, this pattern has them. You have three sizes, small, medium and large. Then added to that, you have a range of different brim sizes and also brim finishes to make your hat just how you like. I personally like to go large when it comes to brims and give my boys lots of protection from the sun, so my brims are the second largest brims and the boys are wearing medium sized hats.

Frog detail - red hat

My favourite thing with these hats, I wasn't really sure wasn't going to work. I love the appliqué. I applied some Steam-a-Seam 2 to the back of some left-over lining fabric and then cut it out a couple of frog motifs, really carefully. I then peeled off the backing and ironed them onto the (already interfaced) crown pieces. I lowered the feed dogs and used my free-motion foot to stitch them down.

DSCF2083

I was really worried about those long, skinny toes, but it seems to have worked. I did three laps around each frog, matching the main colour of the frog on each one. When I did the toes, I didn't so much go around the edges as I did kind of meander along them.

Noah - frog hat

I have made these hats before using corduroy, which has really stood the test of time. The boys hats have been through the ringer and so abused, yet they still look really good. The lining in the old hats was a Kokka cotton-linen, so it will be interesting to see how well the quilter's cotton holds out.

Liam frog hat

I'll be back here very soon to do the wrap up from the sew-along...

Monday, 24 September 2012

You Light Up My Life

DSCF2062

When Noah asked for a "torch" birthday cake, I thought I might construct somthing using my nut-loaf tin.

DSCF2057

But then he said he wanted a yellow torch, like daddy's.

DSCF2055

A yellow, (Eveready) dolphin torch.

DSCF2051

That lights up, just like a real torch!!! *faints!*

DSCF2056

Thankyou, Amy Badskirt for the idea of using one of these.

IMAG0249

That really, really helped!

DSCF2064

And happy fourth birthday for yesterday, to my amazing Noah. There is nobody in the world quite like you.


Monday, 10 September 2012

Cute as a Button

upload

I've missed blogging a couple of things lately. One of them is this cute little zipper pouch that I pattern tested for Nikki. I know Noah loves little pouches to put his treasures in, so I made this for him. I really expected that he would choose the monkey fabric, but he chose the buttons instead.

upload

This pattern is the You Sew Girl Coin Purse, which has been re-done with lots of new pictures to show the whole process and is available as a downloadable pattern, so you can get started on your purse right away.

upload

I added this cute little aeroplane zipper pull too. Isn't it cute?

Tuesday, 14 August 2012

Noah's Ark

DSCF1007

Every year, Embroidery Library send me a voucher for my birthday. I went for a bit of a look around their site to see what I would like and found this awesome "in-the-hoop" Noah's Ark Puppet pack. In-the hoop means the whole puppet is made in the hoop. There is no having to stitch it all together at the end, the embroidery machine makes the whole thing. Ingenious!

Untitled

I ended up getting a pretty good deal out of the whole thing. In addition to being able to take $10 off my order, the same weekend as my birthday, they had a deal going where you could get 40% off your order, and receive three free designs as well. I was able to combine this deal with my birthday deal and ended up paying about $5 for a $25 set. Embroidery library always has great deals going, so I hardly ever end up paying full price for anything there. If you've got an embroidery machine, they are well worth signing up to. Just make sure you tell them your birthday.

Untitled

Anyway, so I had a bit of fun sewing up these cute little puppets. I am very tempted to go back and buy the fairy-tale set as well. I've told myself that I need to make more of the animals before I start buying any more puppet packs. Really, being a Noah's Ark set, I should be making two of each.

Untitled

A few little tips I would give someone making these:
  • Instead of spray glue, get yourself a Sewline glue pen. It's nowhere near as messy, and much easier to just put a dab where you need it. You use it instead of using pins just to hold everything in place. I found the spray glue stuck a little too well, and with some of the felt it stretched it out of shape a bit.
Untitled

  • Use good quality felt. Some of the felt I used was cheap polyester stuff from my local shop and from Spotlight. You can really tell the difference between the two tigers. The one on the left was made using felt from Plushka, the other was made using the cheap felt. It is so worth spending the extra money to get really nice felt, these little guys don't use very much anyway. The zebra was also made using cheap felt, whilst the Panda was Plushka and the pig and the Monkey were made using felt from Winterwood.

DSCF1012
  • You can skip a lot of the colour changes by using the same colour thread for a bunch of steps. For most of these puppets I used just three colours of thread, one to match the main felt colour, and then the black and white for the eyes (though sometimes I used silver and dark sepia). Generally, for the first four colour changes I used the same colour thread as the felt and then again for the last colour change.

DSCF1007

It's been great fun making these little finger puppets. I would like to try more different kinds of puppets, maybe even design some myself? Do your kids like playing with puppets? Did you play with them when you were little? Have you ever made any puppets? Do you know of any good puppet patterns?

Come and join me and some other crafters over at And Sew We Craft...

Blogging tips