Showing posts with label Bag. Show all posts

Wednesday, 11 June 2014

Purse-frame bag

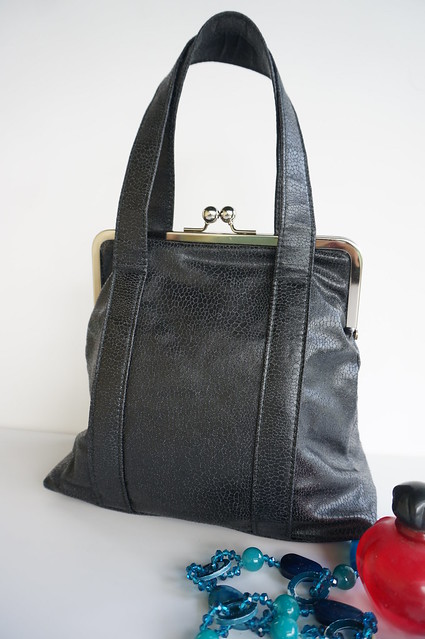
Purse Frame Bag

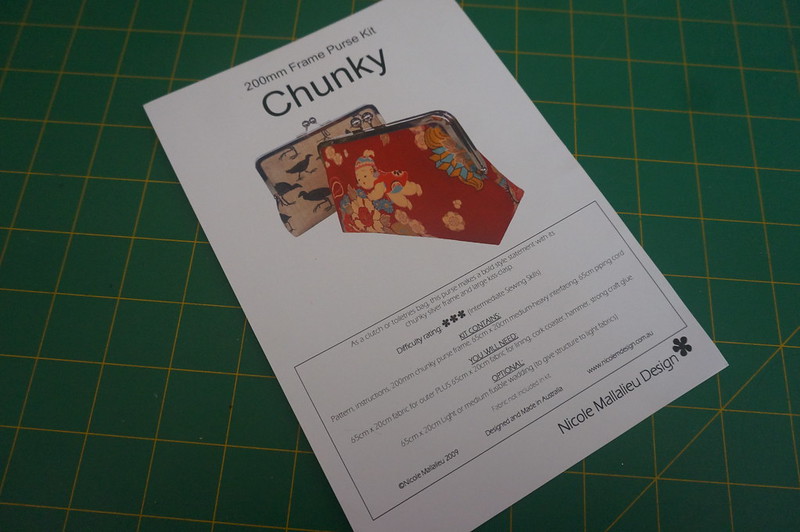
Whilst I have heaps of bags, I felt like I needed something that was a bit more suitable for going out (smaller), that goes with more things. I have always thought that a bag with a purse frame would be cute, but I didn't have a suitable pattern, so I made it using Nicole Mallalieu's 200mm Chunky purse pattern....

"You Sew, Girl!" Chunky 200mm Purse Kit

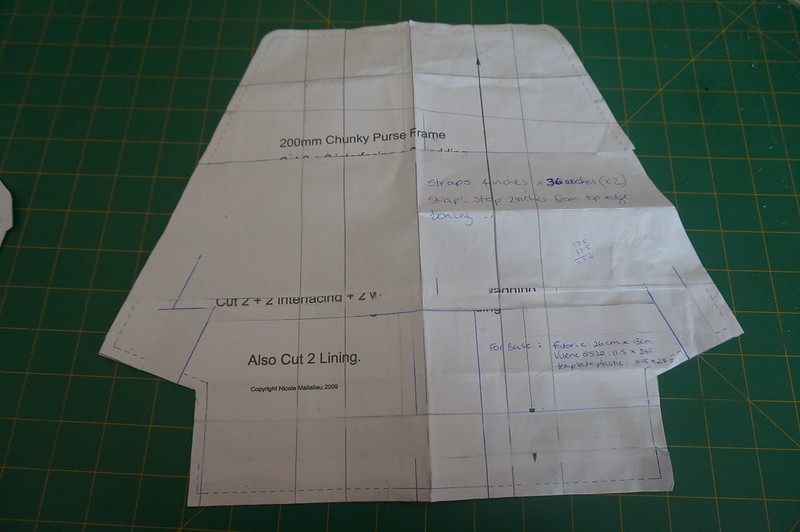
I guess you can tell that I had to make a few modifications to actually get the bag to look like it does using that pattern. I had to slash and spread the pattern to make it bigger in all directions, except for the frame part. I started sewing up a trial bag before I worked on the real thing, but that has mostly been abandoned.

Modified purse frame pattern

The fabric for this bag came from Darn Cheap Fabrics. I think it was about $15 or $16 per metre? It is a fake leather type fabric with a texture that I think is meant to be a bit like snakeskin. The fabric has a bit of stretch in it. I guess it is designed to make skirts or pants out of? I added some iron on wadding to help give the bag some structure and to remove the stretch. There is also boning added behind the straps to give extra support, and help keep the bag standing up straight and tall and not slouching into a puddle.

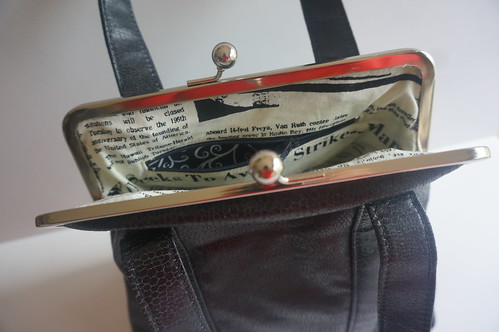
I love the newsprint lining - I think it adds to the vintage feel of the bag. Mostly, bought bags seem to have a dark lining, which I guess is meant to help hide the grime, but I prefer a light-coloured lining, as it helps me to be able to see inside a bag.

Purse Frame Bag - look inside!

I used the instructions in Nikki's new book "The Better Bag Maker" to help me make the zipped pocket inside. Normally, I would be going through my pattern stash, looking for which patterns have that set of instructions, or check my notes from the zippers for bags class I attended - but now I have the book, so I can save myself heaps of time by just referring to that.

The purse also has a nice hard base and cute little round purse feet on the base. Instead of just using it to go out, it seems to have become my everyday bag.

Saturday, 31 May 2014

3 Easy Steps to Make Better Bags

Toronto Convertible Tote-backpack

Step one - GET THIS BOOK!
Step two - read it
Step three - make all the things!!


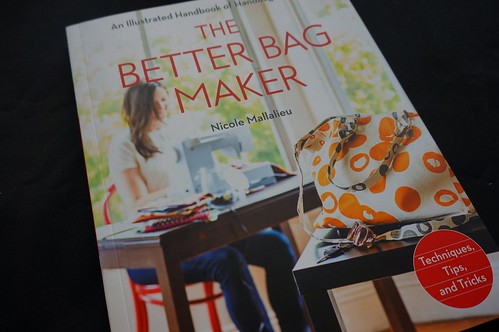
The Better Bag Maker Book

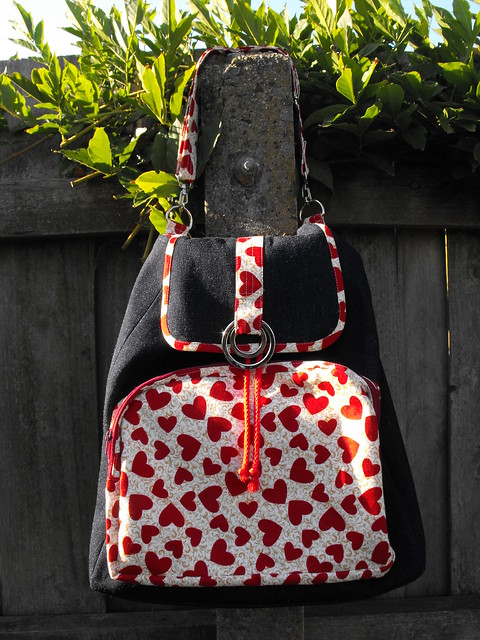
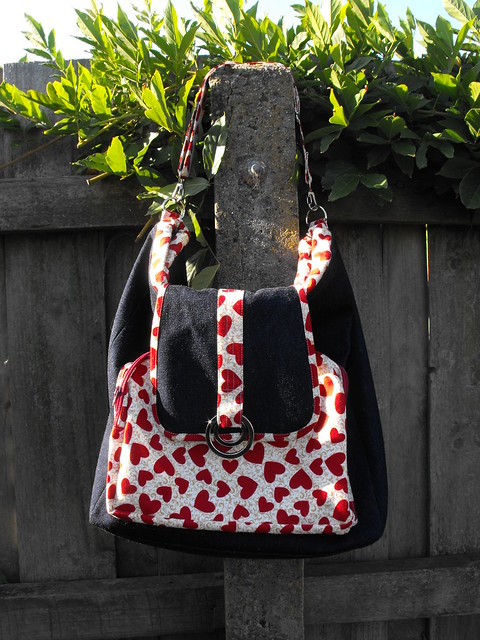
Nicole Mallalieu's latest book is hot off the press and oh boy, is it a good book or what?!! The book comes with the patterns you need to make ten different bags graduating from a basic tote at the start, right through to the fancy-schmancy Toronto backpack as you can see above. I made this backpack about a year ago as a pattern test for the book. It is a really versatile bag, as it converts from a handbag style that you can pop under your arm, to a tote so you can fit in a little more shopping, and then, when you've been at the craft show all day and you're running out of hands to carry all your shopping, it can convert to a backpack!

Toronto as a tote

But ten great bag patterns isn't even the best bit. The part that you will really be loving is the bit right at the start, where Nikki tells all of her best bag-making secrets. Since I started using Nikki's patterns, and learning all her clever tricks, I really feel that my sewing has improved by leaps and bounds. The Better Bag Maker covers quite a lot of the techniques that Nikki uses in her patterns, all in one place. This book tells you how to make professional looking straps, crisp corners and insert zippers like a pro. Nikki shows you how to choose interfacing, as well as how to apply it. You also learn how to install all the yummy metal bits, like magnetic snaps, o-rings and purse feet, that take your bag from homemade to hand made. There are also plenty of different pocket options so that you can make your bespoke bag work the way you want it to. The best part of all this, is that you can use all these great tips on all your other sewing and make everything you do look more professional!

Toronto as a shoulder bag

I am so pleased to have this book on my bookshelf, it is a great reference to have and I have already used it to help me install a professional looking zip pocket inside my latest bag, but that's another blogpost!

Thursday, 27 June 2013

Lantern Bloom Belle

Lantern Bloom Belle

After I finished my super hero cape, I got stuck into testing the Belle pattern for Nicole Mallalieu of You Sew, Girl! It is one of her earlier patterns, but it has now been re-mastered into a digital download. Nikki has updated her pattern with new techniques that she has improved over the past few years.

Lantern Bloom Belle - half open

I surprised myself with this pattern, managing to complete the entire bag in one day. Usually, after one day, I have a bag cut out and the interfacing fused; so this is quite an achievement for me.

As Nikki says in her blog post, the Belle is the perfect size for a little bit of knitting. Of course, you would need to be using circular needles to be able to fit them in the bag.

Lantern Bloom Bell - open

If you make the straps from the pattern, rather than using purchased bag handles, they are the perfect size for popping over your wrist and knitting away. So you could knit standing up, or on the train without having to worry about your ball of yarn rolling away.

Lantern Bloom Belle - hanging

I used Laura Gunn Lantern Bloom fabric for the exterior, and the lining is Dogwood stripe from the Poppy Collection. I love the way some of the blooms magically joined at the seams, I have used this fabric before, to make my Teardrop Purse.

The best part is that the Belle is digital, so you can download the pattern and get started right away!

For this project I used fabric only from my stash.
SYST13 Running totals: in = 176, out = 66, total = +110

Monday, 3 December 2012

Antique Leather Hobo

DSCF2409

The other day, I set myself a twenty-four hour challenge to make Nicole Malllalieu's Hobo bag, using some beautiful antiqued, lambskin leather I had from NSW Leather Co. I had been thinking about making this bag for a while, and with a Christmas "do" to attend with a new dress that all my current bags clash with, it was at the front of my mind. Someone had said on Facebook, that they managed to put one together in about three hours, and although they hadn't used leather, I thought I should at least have a go. I mean, I had 24 hours and who needs to sleep? (Me! I do!)

DSCF2410

Well, it wasn't to be. I managed to get most of the outer bag constructed and then ran into some trouble inserting the zip. Trouble included some problems with leather that is a little stretchy, and some thread-matching and tension issues. In hind-sight, if I was making this particular bag again, I would make the zip gusset entirely from leather.

Something that I have learned about my machine is that it really does like the upholstery thread. I can't seem to be able to adjust bobbin tension enough to cope with other thread thicknesses, and even so, it is difficult to balance the tension so that there is no top thread showing on the bottom or bottom thread showing on the top. So I headed to a nearby store to get some upholstery thread in a lighter colour so it wasn't too dominant on the underside of the fabric.

DSCF2411

I also found that the leather liked to stretch out a bit, so, combined with a non-stretchy lining fabric, it was a bit of work to get a nice, non-twisty zipper gusset going on. I found that going really slowly and carefully and using my new Clover clips, I was able to construct something that was acceptable. Switching from the zipper foot to the proper teflon foot, just for the stay stitching along the hidden edge of the gusset really helped. Actually, looking at the finished product, I am more than happy with it.

DSCF2413

I used both of the pocket options for the lining. There is a zippered pocket and also another pocket with a pleated mobile phone slot. I did this pocket back to front to Nikki's pattern so that the phone pocket was easily accessible. (I had the zipper pocket closest to my body and the phone pocket further away). If I was only doing this pocket, then I would do it exactly as per the pattern. I am really fussy about the direction of zips too. I like my zipper head at the front when the bag is closed, both for internal and external pockets.

Another little grievance I have with my industrial machine is the feed dogs are a little harsh on soft, lambskin leather and can leave nasty track marks. I learned this when practicing making straps when I made my Red Leather City Bag. When making the City Bag, I used tear-away stabiliser to protect the leather from the feed-dogs. I think it works fairly well, though I don't like the way the thread gets pulled when tearing away the tear-away. I thought this time I would use paper towel. I don't think I will do this again, as it is really tricky to remove paper towel fibres from under stitches. I have another idea that I might try next time.

DSCF2412

I love the wide strap on the bag. I made it exactly to the pattern piece, although I only did minimal top-stitching, just along each edge as I think it worked really well with the leather I was using and the over-all slouchiness of the bag. I didn't use any o-rings for this bag. If I did, I would have preferred brass ones and I didn't have any in my stash. I think this was a good decision for this particular bag, there would have been a lot of extra bulk where the straps are attached, which I don't think would have suited the relaxed style of this bag.

Over-all, I am pretty happy with this bag. Could I have made the bag in twenty-four hours? Possibly. I'm not really sure? I am guessing that I actually spent about twelve hours making this bag. Maybe more? I have little kids though, so finding twelve hours out of a twenty-four hour period of time is nearly impossible. Realistically, I would give myself a week, or at a bare minimum, a weekend to make this bag again out of leather. I could make it a lot quicker in quilter's cotton, but I cannot see myself making the entire bag in three hours.

Sunday, 14 October 2012

14. You Little Beauty

Beauty Case

Don't you love it when a plan comes together?

Beauty Case (open)

When a project turns out exactly as you imagined...

Beauty Case (back)

The perfect fabric for this pattern (watch this space) just so happened to be in my stash, waiting for something like this to come along.

Beauty Case (top)

I'll be back another day with more details.

Sunday, 17 June 2012

Sashiko Satchel

DSCF1556

I originally started this bag, back in April. Firstly, I did all the Sashiko Stitching after purchasing some variagated perle cotton at the AQC. I then had all the bits cut out ready for a Nicole Mallalieu workshop I attended with the ASG the following weekend.

DSCF1560

Really, all I achieved at the workshop was getting the base done, and the purse feet on the bottom.

DSCF1568

And then it sat there, doing nothing for weeks, whilst seeminly more important things were completed instead.

DSCF1566

On Friday, I decided enough was enough, and I finally got this bag finished yesterday, just before dinner.

DSCF1565

You can see above, that I over-came my issue with the zipper foot and the magnetic snap from yesterday. I ended up ditching the zipper foot altogether, used my regular foot and shifted my needle as far left as it would go. The regular foot offered more stability, and I really feel that the needle should be within coo-ee of a foot, otherwise what is the point of having a foot there at all? Janome really need to look at the design of their standard zipper foot a bit more closely. I struggle a bit with zips at times, because you need to raise the presser foot to full height to get the zipper head under the foot, and it won't stay at full height, it needs to be held there. This means you need one hand for the lever, one for moving the zipper head, and another for holding the fabric, so that you can pull that zipper head. That's one more hand than what I have! Ugh!

DSCF1567

I went with an adjustable strap, so that it can be worn across the body or neatly tucked up under the arm.

DSCF1557

I really like the simple style of this bag. The pattern is Nicole Mallalieu's Large Tote & Satchel. I just used some of the dark denim from my stash, the same denim I used for my skirt, Liam's jeans and my Wren City Bag. The flap is the perfect canvas for any art-work you want, to make your bag stand out from the crowd.

*This Sashiko Satchel is available for sale in my shop.
 

Check out some more Creative People, over here!

Saturday, 16 June 2012

Issue with Janome Zipper Foot

DSCF1549

Does anyone else have this problem? The zipper foot gets me past the magnetic catch just fine, but the part where it snaps onto the machine gets in my way!

Apart from sewing further away from the magnetic catch, which is the obvious solution, does anyone have any ideas to get around this problem? Is there an alternate Janome foot that is not a "snap-on" that I can use? I can't think of any examples at the moment, but this is not the first time I have had this issue with the Janome zipper foot.

DSCF1554

By the way, if I were to sew further away, I may as well use a standard foot. If you can see, on the other side of the magnetic catch, I have a bulky seam to sew along too, so that doesn't help either. So frustrating!

Update: You can see my solution here: Sashiko Satchel

Saturday, 29 October 2011

Can't Stop

DSCF1198

I'm too busy to blog tonight.... top-stitching.

Tuesday, 18 October 2011

Wren City

DSCF1081

This is what I have been working on over the past few days. The pattern is Nicole Mallalieu's City Bag, and I used some of my precious "Wrens" Fabric by Tegan Rose for Ink & Spindle. I've teamed the Wrens fabric with some denim that was in the same dark inky colour.

DSCF1082

This is the first proper bag I have made on the industrial machine. I am actually surprised with how easily it came together. I guess all the practice with the machine has actually paid off. The magnetic seam guide helped a little, too!

DSCF1083

I even managed to insert a zipper on a curved seam, and an internal zipped pocket with no dramas!

DSCF1077

The bag wouldn't be complete without a bit of bling, and I was really undecided whether to go with my usual choice of silver, or if I should go with the brassy rings and feet to go with the natural tones of the Ink & Spindle fabric. I'm glad I chose silver, it's so shiny!

DSCF1079

I have spoiled myself with an internal zippered pocket, using more of Tegan's Wren fabric. It's so beautiful, and only I will see it in there, but the bag is for me, so why not?

DSCF1080

The next bag I plan to make is leather.... wish me luck!

Thursday, 13 October 2011

My Creative Space - On my way to "Leather City"

DSCF1034

I'm working myself up to making a leather City Bag. I have a small project from Nikki's book cut out and ready to go. Once I have made that, I plan to make a City Bag in Denim, with a bit of Ink & Spindle to make it more exciting, and then... then I will do the leather bag that I have been planning to do for ages.

What's happening in your Creative Space this week?

Monday, 18 July 2011

Bus Stop Bag

DSCF1029

Sorry it has been a bit quiet on the blog. I've been a bit busy lately with the kids. Anyway, I have been meaning to blog about this Bus Stop Bag for ages, so now is a good time, I guess. When I made this bag it was all hush-hush as it was a secret squirrel pattern testing project for Nicole Mallalieu's book, You Sew, Girl!. Now that the book has been published (um, yeah, a while ago....) it is okay for me to blog this.

DSCF1031

The fanciest part of this bag is the seam binding, which is quite tricky, and one of the reasons the pattern has been given the advanced skill level rating. Never fear though, if you think it might be a bit too tricky, you can put the seam binding on the inside until you are confident with the technique. I would also recommend that you try the toiletry bag first as it isn't as stiff as the bus-stop bag, and therefor a little easier to manipulate on the sewing machine.

DSCF1028

The finished bag is quite sturdy and has a firm base with shiny purse-feet. It stands up al by itself and there was enough room inside for the toiletry bag and my hairdryer and a number of other assorted personal items when I was in hospital having Amelie back in January. If you've ever had a baby, you will be aware of all the extra toilety items you need in those early days and trust me, there was room inside for all of these!


DSCF1027

If you want to make yourself one of these, you need to get your hands on a copy of Nikki's book, You Sew, Girl! For the cost of a couple of patterns, it is chock-a-block full of tips, techniques and patterns to make all sorts of lovely things.

Sunday, 10 October 2010

Distraction....

DSCF1448

I was reading the paper this morning, and noticed a competition* where you can win a free (expensive) nappy bag. It got me thinking.... I once bought this pattern, with the intention of making a nappy bag from it, and I haven't yet. And I have a baby coming soon, so could probably use a swish new nappy bag.... hmmm...

What do you think are the essential features of a good nappy bag?

*I ripped out the ad, and intended to enter the competition, and somehow got distracted and it never happened and do you think I can find the ad now??

Monday, 28 December 2009

Presents for Little Boys

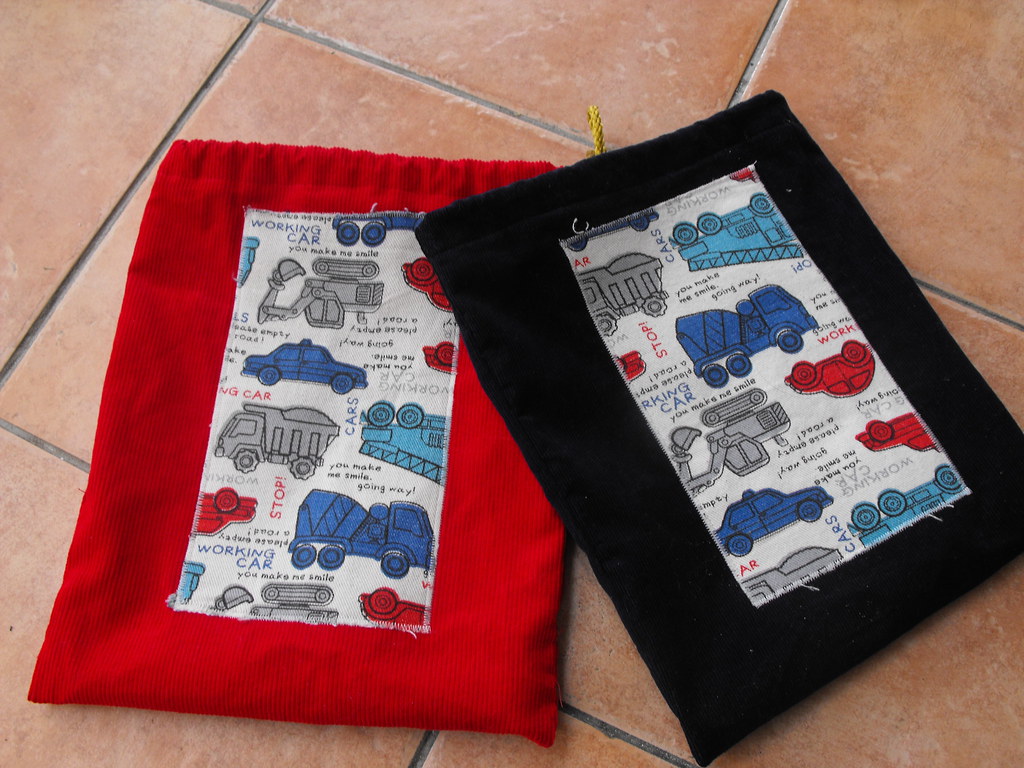
I made eight of these for my sons and nephews for Christmas. Actually, I lie. I made seven, the eighth one (which is brown) is sitting in my to-do pile. I was up until 4am on Christmas morning finishing these off.

Apart from the applique on the front, all the other stitching was done on the industrial machine. I used my regular machine for the appliqué as the industrial machine only does straight stitch.

The main fabric is corduroy from my stash, and the appliqué fabric was a freebie from Retro Mummy. I used the eyelets that came in the packet with my eyelet pliers. They aren't flash, but they were fine for this job as the back of the eyelet is not visible.

I used one long length of fabric and folded it in the middle to make the bottom edge of the bag. (I know this means that half of the corduroy has its nap the wrong way, but I don't think it really matters). The sides are done with French seams. The cord on these two bags were the handles from a dress shop bag. I actually bought some extra cord from Spotlight to do the others.

The bags were a hit. My Dad didn't really get why they were so popular until we explained that they each had a couple of match-box cars inside. (Tee-hee!) The idea is that the bags are to be used to store matchbox cars as my kids and their cousins have an awful lot between them and they all sink to the bottom of the toy box.

Thursday, 22 October 2009

My Creative Space

My Creative Space this week was largely dominated by this Laptop Bag. Actually, to be honest, my creative space was dominated by a pair of toddlers. I don't know if it is just me, but the stronger my desire to get into the sewing room and get something done, the more desperately the kids want my attention. I need to practise acting more cavalier...

The laptop bag has a large patch pocket on the front, and a divided pocket across the inside at the back. I made fabric straps out of the pinwale corduroy, and I added a little hook (not part of the pattern) so mum can put her keys in there without losing them. I've added my hand made label to the facing above the inside pocket. The bag also has a hard base and purse feet.

As always, I learned some new things and developed some new skills whilst making this bag. The first may help clarify the previous blog post...

Sometimes it is difficult, or even impossible to use pins to hold things together. There are various things you can do to get around this, like paper clips, bulldog clips, hair clips, sticky tape... anyway, Nikki advises using sticky tape to hold various things in place throughout the project - which is a really, really, good tip. I used sticky tape and then sewed over the top, through the tape (along the entire length of the seam. I am not really sure what the cause was (Nikki uses tape from Officeworks, mine was Scotch Magic Tape, or maybe my needle was a little blunt?) Removing teeny tiny bits of sticky tape from pinwale cord isn't fun... so here's a tip; Use tape in place of pins where required, but remove it before your presser foot reaches it. Actually, another really good tip is to read all of the instructions before you begin a project, because Nikki does advise this in her instructions!

Another thing I have learned from this project is, if you have a machine that struggles with wadding (the feed dogs on mine totally ignore wadding), a walking foot can be your saviour. You will still need to backstitch your ends though, and I have been advised that walking feet are like emus and kangaroos, they don't do backwards, so you need to swivel your project, and sew back in the other direction, and then swivel back again to sew in the correct direction.

Beware of velcro, as it may stick to your clothes, parts of your project, and other items laying around the sewing table, and unguarded sticky fluff removing devices can also stick to projects if you don't put them away. I was having major dramas with everything in my sewing room being stuck together this week!

Sometimes it is nice for things to stick together though, and due to another tip in the pattern, I actually used the applique spray that mum gave me (ages ago), and wow that stuff is brilliant! I will be using it again - LOTS!


If you want to see what is happening in other people's creative spaces this week, wander over to Kootoyoo, and take a look!

Saturday, 17 October 2009

BLOGTOBERFEST - DAY 17 - Laptop Sleeve

Thursday nap-time was great for sewing. I also completed this padded laptop sleeve for my mum's laptop. The pattern is the free Nicole Mallalieu Laptop Sleeve tutorial available from WhipUp. The instructions are also included in the Laptop Bag pattern.
Nikki also includes instructions as to how to adjust the size to fit different laptops. I wasn't sure about the size, but I measured my mum's laptop and found it was the same size as Maxx's. I made the sleeve first, as I figure that if the laptop fits in there okay, then it will fit in the bag too. It turns out it is a really good fit if you leave the pattern as is.

Hopefully, in the next day or so, I should have the bag completed... wish me luck!

Blogging tips